
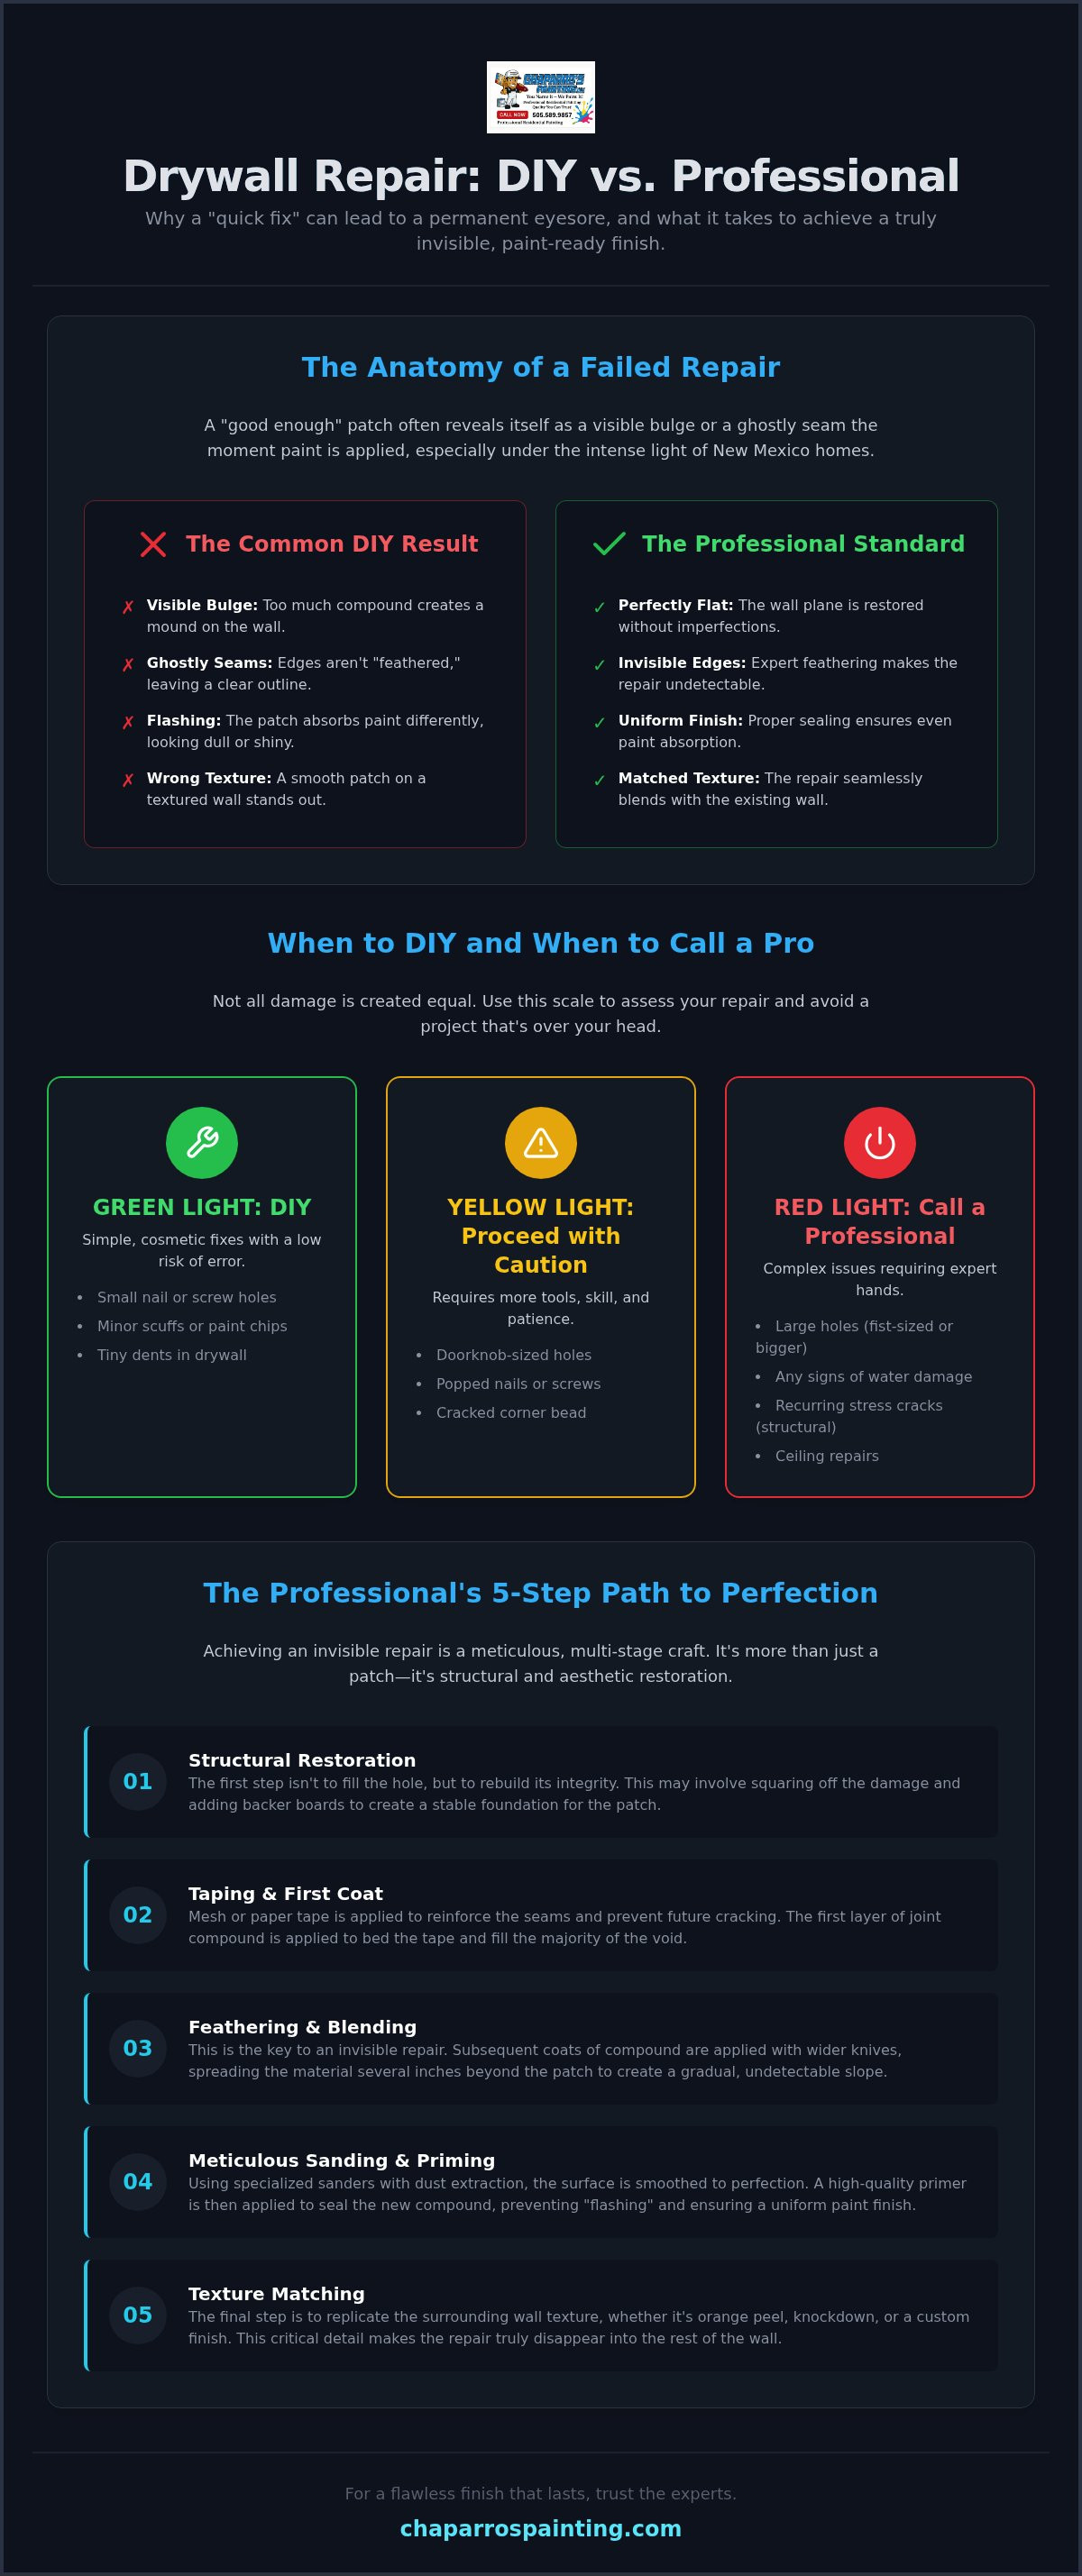
What if that "quick" drywall patch you're planning actually makes your wall look worse once the paint dries? It's tempting to grab a $20 kit from the hardware store to handle a small hole or crack yourself. Most homeowners want to save money and skip the dust and mess of a larger project. However, the debate of DIY vs professional drywall repair often comes down to what happens after the sanding is done. A "good enough" patch often reveals itself as a visible bulge or a ghostly seam the moment you apply a fresh coat of paint.
You deserve a wall that looks like the damage never happened. We understand the frustration of seeing an ugly hole ruin a room's aesthetic. In this guide, you'll discover the hidden costs of DIY fixes and learn when a professional touch is essential for a seamless, paint-ready finish. We'll examine the tools required, the time involved, and the specific signs that a repair needs a seasoned craftsman's hand to ensure your final paint job looks flawless and your home stays clean. Making the right choice now saves you time and avoids the frustration of a repair that stays visible for years.
Key Takeaways
- Understand why professional drywall repair is a multi-stage process that ensures a seamless, invisible finish rather than a visible patch.
- Factor in the hidden costs of specialized tools and materials when deciding between DIY vs professional drywall repair for your project.
- Learn how to use a complexity scale to identify "Green Light" DIY tasks like small nail holes versus repairs that require structural restoration.
- Discover how expert sanding and priming prevent the common "bulge" or visible seams that often ruin a final interior paint job.
- Save hours of frustration and messy cleanup by choosing a professional approach for any damage larger than a minor scuff.
The Hidden Complexity of Drywall Repair: Why It’s More Than Just a Patch
Professional drywall repair is far more than a simple cosmetic fix. It is a multi-stage process that combines structural restoration with meticulous aesthetic blending. To truly understand the challenge, you must consider what drywall is at its core. It is a gypsum-based material that provides both a fire-resistant barrier and a smooth canvas for your home. When damage occurs, you aren't just filling a hole. You are rebuilding the integrity of that surface. In the ongoing debate of DIY vs professional drywall repair, the primary differentiator is the standard of the final result. For a high-quality home, "invisible" is the only acceptable benchmark.
In our region, the environment plays a significant role in how walls age. Drywall repair is the most critical foundation for successful interior painting Rio Rancho. The intense, direct light in New Mexico homes acts like a magnifying glass for even the smallest imperfections. A patch that looks acceptable under a lamp at night can become a glaring eyesore when the midday sun hits the wall. Chaparro's Painting, LLC treats this prep work as a specialized craft. Achieving a seamless look requires more than just a putty knife; it requires an eye for how light interacts with texture.
Common Types of Drywall Damage in New Mexico Homes
Homes in the desert face specific structural stresses. The extreme temperature swings between hot days and cold nights cause building materials to expand and contract. This cycle often results in thin, recurring stress cracks near door frames and window corners. Foundation settling also contributes to these issues, pulling at the seams of the drywall panels. Beyond environmental factors, everyday life takes a toll. Impact damage from moving furniture, doorknobs hitting the wall, or household accidents can leave jagged holes that compromise the wall's surface. Water damage is another serious concern. It often requires removing saturated sections to prevent mold growth, making it a much larger task than a simple surface patch.
The Goal of the 'Invisible' Repair
The hallmark of a professional repair is that you cannot tell where the damage originally happened. Achieving this requires a technique known as feathering. Instead of just filling the hole, a craftsman spreads the joint compound several inches beyond the edges of the damage. This creates a very shallow, gradual slope that the human eye cannot detect. If you skip this step, you'll likely deal with "flashing." This happens when the new patch material absorbs the paint differently than the original wall surface. Even with high-quality paint, the patch may appear duller or shinier than the rest of the wall. Professional repairs include proper sealing and texture matching to ensure the finish remains uniform across the entire surface.
DIY Drywall Repair: Tools, Materials, and the Learning Curve
Many homeowners start a repair project thinking a $10 tub of spackle and a plastic putty knife will suffice. The reality of DIY vs professional drywall repair is that achieving a flat, paint-ready surface requires a specific arsenal of equipment. To do the job right, your shopping list quickly expands beyond basic filler. You'll need various joint compound types, specialized taping knives in multiple widths, a mud pan or hawk, and specific sandpaper grits. Buying these tools for a one-time fix often costs more than the repair itself, yet using subpar alternatives almost guarantees a visible patch.
Mudding is a tactile skill that takes years to master. It isn't just about spreading paste over a hole. It involves managing the pressure of the knife to create a perfectly tapered edge. Beginners often struggle with "ridges" or "valleys" in the compound, leading to an endless cycle of sanding and re-applying. Then there is the mess. Fine drywall dust is insidious. Without professional vacuum systems and containment strategies, this white powder permeates furniture, carpets, and air vents. It's a cleanup headache that many DIYers don't anticipate until it's too late.
The DIY Tool and Supply Investment
Professional results require professional materials. You'll need to choose between all-purpose joint compound and "hot mud." All-purpose mud is easier for beginners to sand but takes much longer to dry. Hot mud, or setting-type compound, hardens through a chemical reaction and allows for faster layering, but it's difficult to work with if you aren't fast. You also need a range of sandpaper. Starting with a coarse 120-grit and finishing with a 220-grit is standard. Use the wrong grit, and you'll either fail to level the surface or leave deep scratches that show through your paint.
The Reality of the DIY Timeline
A project that looks like a one-hour fix on a video tutorial usually takes three days for a homeowner. Each layer of joint compound must dry completely before you can sand or add the next coat. In the unique climate of Albuquerque and Rio Rancho, our low humidity can be a double-edged sword. While it helps mud dry faster, it can also cause "shrinkage cracks" if the compound is applied too thick or dries too aggressively. If you find yourself overwhelmed by the sand-mud-repeat cycle, it might be time to consult a local expert who can handle the prep work efficiently.
Most DIYers underestimate the drying time required for deep holes. If you paint over mud that's still slightly damp in the center, the paint will eventually peel or bubble. A professional knows exactly how to balance layer thickness with local environmental conditions to keep the project moving without sacrificing the structural integrity of the repair.
DIY vs. Professional Drywall Repair: A Direct Comparison
Deciding between DIY vs professional drywall repair often comes down to how you value your time and the final aesthetic of your home. A homeowner might spend an entire weekend researching, shopping, and attempting a single patch. An experienced craftsman can often complete the same repair in a few hours of active work. This efficiency stems from years of muscle memory and specialized equipment that most homeowners don't own. While a DIY attempt might result in a "functional" patch that covers the hole, a professional repair is "seamless," meaning the damage disappears entirely under a fresh coat of paint.
Stress and cleanup are significant factors in this comparison. Professionals use advanced dust containment strategies and HEPA vacuum systems to keep your living space liveable. Without these tools, fine white dust often finds its way into kitchen cabinets and air vents, lingering for weeks after the project ends. Just as meticulous exterior paint prep work is the secret to a lasting New Mexico home finish, high interior standards require a clean, stable foundation before the first drop of paint hits the wall.
Cost Analysis: Upfront Savings vs. Long-Term Value
The initial cost of DIY repair seems low. You might spend $50 on basic mud and tape. However, if that patch fails or remains visible, you'll eventually pay a professional to sand it down and start over. This "re-do factor" is a common hidden cost. A poorly executed patch can also impact your home's resale value. Potential buyers often view visible wall repairs as a sign of deferred or amateur maintenance throughout the rest of the property. Investing in professional help ensures the job is done correctly the first time, providing better long-term value for your investment.
Quality and Durability Standards
Professional repairs prioritize structural integrity. Many DIYers rely on self-adhesive mesh tape because it's easy to apply. Professionals often prefer paper tape embedded in a specific layer of joint compound. This creates a much stronger bond that prevents cracks from returning. A seasoned pro also looks beyond the surface. They can identify if a crack is a simple cosmetic issue or a symptom of something more serious, such as a hidden plumbing leak or significant structural shifting. Identifying these underlying problems early prevents you from wasting money on a surface fix that will only fail again in six months.
- DIY Quality: Often leaves a slight "hump" or texture mismatch.
- Professional Quality: Perfectly flat surface that accepts paint uniformly.
- DIY Durability: Prone to hairline cracks or bubbling tape.
- Professional Durability: Reinforced layers designed to withstand New Mexico's temperature cycles.
The Complexity Scale: When to DIY and When to Call a Pro
Evaluating the scale of damage is the first step in the DIY vs professional drywall repair decision. Not every hole requires a contractor. Small nail holes from hanging pictures or minor scuffs from moving chairs are manageable for most homeowners. These "Green Light" projects require minimal mud and simple sanding. We often recommend homeowners handle these small cosmetic touches themselves. However, as the damage grows, so does the risk of a visible failure. What looks like a small fix can quickly become a multi-day ordeal if the structural backing is missing.
"Red Light" projects involve structural compromises or high-stakes finishes. Large holes, typically those fist-sized or larger, usually require structural backing and multiple layers of compound to prevent the patch from sagging. When comparing DIY vs professional drywall repair for ceilings, the risk of a messy failure is high. Water damage is perhaps the most critical professional-only category. It often hides mold or requires cutting out large sections of wallboard to find the source of a leak. With over 20 years of experience, we've seen how a small water spot can hide significant internal damage that needs expert attention.
The Texture Matching Challenge
In New Mexico, most walls aren't flat. They feature knockdown or orange peel textures. Matching these is an art form. DIYers often use aerosol cans from big-box stores. These cans lack the pressure control needed for a subtle blend, which frequently results in "bald spots" or "heavy globs" that don't match the original wall. Professional craftsmen use specialized pneumatic spray equipment. This allows us to adjust the air pressure and nozzle size to mimic the existing pattern exactly. If you want a seamless look that integrates perfectly with your existing walls, request a professional estimate before attempting a texture match yourself.
Ceiling and High-Visibility Area Logistics
Repairing a ceiling is physically demanding. You are fighting gravity while trying to keep wet mud on the trowel. If the mud is too thin, it drips; if it's too thick, it sags. High-visibility areas like foyers and long hallways are also high-risk. These spots are subject to "critical lighting," where light grazes the wall at an angle. This lighting reveals every minor bump or dip in your patch. Safety is also a concern. Working on ladders with heavy tools increases the risk of falls for those without proper training. Professionals use scaffolding and proper lighting to ensure the repair is flat and safe from every angle.
Professional Results: How Expert Repairs Elevate Your Painting Project
Chaparro's Painting, LLC treats drywall repair as the most vital stage of the preparation process. We don't see painting as a way to hide flaws; we see it as a way to highlight a perfectly restored surface. When homeowners weigh the choice of DIY vs professional drywall repair, they often overlook how the texture and porosity of the patch affect the final color. A patch that isn't perfectly integrated will always catch the light differently, no matter how many coats of paint you apply. Our team ensures the surface is chemically and physically ready to bond with the paint, creating a unified look that lasts.
Professional sanding and priming go beyond just making the wall flat. We focus on matching the porosity of the repair to the original wallboard. If the patch is too thirsty, the paint will look flat and dull in that specific spot. By using specialized primers and fine-grit sanding techniques, we ensure the paint absorbs evenly across the entire room. This level of detail is why we encourage clients to look at our work on exterior painting Rio Rancho. The same commitment to surface preparation that protects a home from the desert sun is applied to every interior wall we touch.
The Synergy of Repair and Paint
The synergy between repair and paint is where the true value of a professional lies. A seamless repair allows the true color and sheen of your chosen paint to shine without visual interruptions. We prime patches using a spot-priming technique followed by a full coat to ensure total uniformity. This prevents the repair from being visible when viewed from a side angle. By hiring a single contractor for both the repair and the finish, you eliminate the risk of one trade blaming the other for a poor result. You get total accountability and a much smoother project flow. We handle the heavy lifting of the repair so the final finish looks exactly as you imagined.
Choosing a Trusted Local Partner in Rio Rancho
Choosing a trusted local partner means working with someone who understands the specific needs of homes in our community. Jaime Chaparro brings over 20 years of industry experience to every project. As an owner-operated business, Chaparro's Painting, LLC prioritizes a clean workspace and clear expectations. When we provide an estimate, we don't just give you a number; we explain the logic behind every repair step. This transparency ensures you feel confident in the process from the initial prep to the final brushstroke. We take quiet pride in our craftsmanship and the peace of mind we provide to our neighbors. For those ready to move forward, get a professional estimate for your home refresh and experience the difference of a truly expert finish.
Restore Your Walls with Professional Confidence
Your walls are the foundation of your home's interior beauty. While we've discussed the technical hurdles of mudding and the physical strain of ceiling repairs, the most important takeaway is that you don't have to tackle these challenges alone. The choice between DIY vs professional drywall repair ultimately determines whether your home feels like a construction zone or a finished sanctuary. Investing in a professional touch ensures that your walls stay smooth and stable, even as the New Mexico climate shifts. This allows you to enjoy a flawless environment without the stress of lingering imperfections.
Chaparro's Painting, LLC brings over 20 years of local residential experience to every project. As an owner-operated business, we take quiet pride in meticulous craftsmanship and specialized texture matching that restores your home's aesthetic. We handle the dust, the drying times, and the technical precision required for an invisible finish. This dedication to prep work ensures your final paint job looks polished and professional from every angle. We are ready to provide the dependable, high-quality service you need for a lasting result.
Get a Free Interior Painting & Repair Estimate from Chaparro’s Painting, LLC. Let's work together to make your walls look like the damage never happened.
Frequently Asked Questions
Is it cheaper to fix drywall yourself or hire a professional?
Fixing drywall yourself is usually cheaper in terms of initial material costs for small kits. However, the true cost of DIY vs professional drywall repair includes the time you spend and the price of specialized tools you may only use once. If a DIY patch fails, you eventually pay more for an expert to sand it down and start over. Hiring a professional ensures the job is done right the first time, protecting your home's resale value.
Can I just paint over a drywall crack without repairing it?
You shouldn't just paint over a drywall crack because the paint will eventually bridge the gap and crack again. Cracks are often caused by structural movement or temperature changes in the New Mexico climate. Without proper tape and joint compound, the paint can't hold the wall together. A professional repair addresses the underlying separation, ensuring the surface remains stable and the new paint job stays flawless for years rather than weeks.
How long does a professional drywall repair typically take?
A professional drywall repair typically takes between one and three days to complete. While the actual labor might only take a few hours, each layer of joint compound requires significant drying time before sanding and the next application. An experienced craftsman uses these windows efficiently, often scheduling multiple visits to ensure every coat is perfectly cured. This methodical approach prevents the cracking or bubbling that often occurs when a home project is rushed.
Why does my drywall patch show through the paint?
Drywall patches often show through paint because of "flashing" or a failure to match the existing wall texture. New joint compound is more porous than old drywall, so it absorbs paint differently, creating a dull or shiny spot. Using a high-quality primer on the patch before painting helps create a uniform surface. Additionally, a professional ensures the edges are feathered correctly so there isn't a visible hump where the repair meets the original wall.
Do I need to sand the wall before I apply a drywall patch?
You should always sand and clean the area before applying a drywall patch. Removing loose paper, old paint, or crumbling gypsum ensures the new joint compound bonds securely to the wall surface. If you skip this step, the patch might eventually peel or crack away from the drywall. A clean, slightly scuffed area provides the best foundation for a repair that stays in place and blends seamlessly with the rest of your interior wall.
Can a painter also do drywall repairs in Rio Rancho?
Many professional painters in Rio Rancho, including Chaparro's Painting, include drywall repairs as a standard part of their prep work. We believe that a high-quality interior paint job is impossible without first fixing any holes or cracks. With over 20 years of experience, we handle everything from minor scuffs to large impact damage. This "one-contractor" approach ensures consistency and accountability for the final look and feel of your home's interior walls.
What is the hardest part of DIY drywall repair for beginners?
The hardest part of DIY vs professional drywall repair for beginners is mastering the art of feathering. Spreading the mud so thinly that the transition between the patch and the wall is invisible takes significant practice. Beginners also struggle with texture matching, often leaving heavy globs or bald spots on the wall. Achieving that perfectly flat, seamless look requires a steady hand and a deep understanding of how different materials react to pressure and humidity.
Is drywall dust dangerous to breathe during a DIY project?
Drywall dust is a significant respiratory irritant that can cause coughing and throat irritation if inhaled. During a DIY project, you should always wear an N95 mask and protective goggles to minimize your exposure. Fine dust particles can also settle into your HVAC system and circulate throughout your home. Professionals use HEPA vacuums and specialized containment strategies to keep this dust from spreading, protecting both your health and your home's cleanliness during the repair.


