

The most expensive paint in the world won't save a home that hasn't been prepped for the high-desert sun. In New Mexico, the paint you choose is often less critical than the surface beneath it. You've likely noticed houses in Rio Rancho where the finish starts chalking or peeling after only a few seasons. It's frustrating to see cracks reappear or find sand preventing a smooth bond. Understanding how to prepare stucco for painting is essential because our local elevation creates 25 to 30 percent more UV exposure than coastal areas. Standard methods simply don't hold up here.
Doing the job right means the difference between a finish that lasts 12 years and a DIY project that fails in three. We've spent over 20 years refining a meticulous process specifically for the Albuquerque climate. This guide outlines the professional steps required to seal cracks, remove desert dust, and apply the right masonry primers. You'll discover how to protect your home from moisture and extreme temperature swings while ensuring a clean, long-lasting result that stands the test of time.
Key Takeaways
- New Mexico's high altitude increases UV intensity by nearly 30 percent, making specialized prep work a requirement for any long-lasting finish.
- Learn how to prepare stucco for painting by using a precise powerwashing range of 1,500 to 2,000 PSI to remove desert dust without damaging the substrate.
- Use breathable elastomeric caulk to seal hairline cracks and structural gaps, preventing moisture penetration while allowing the stucco to expand and contract.
- Mechanical scraping and feather-sanding are essential steps to eliminate flaking paint and create a smooth, crater-free surface for new coatings.
- Professional preparation standards protect your investment against extreme temperature swings and can extend the life of your paint job to over a decade.
The High-Desert Challenge: Why Prep is Critical for New Mexico Stucco
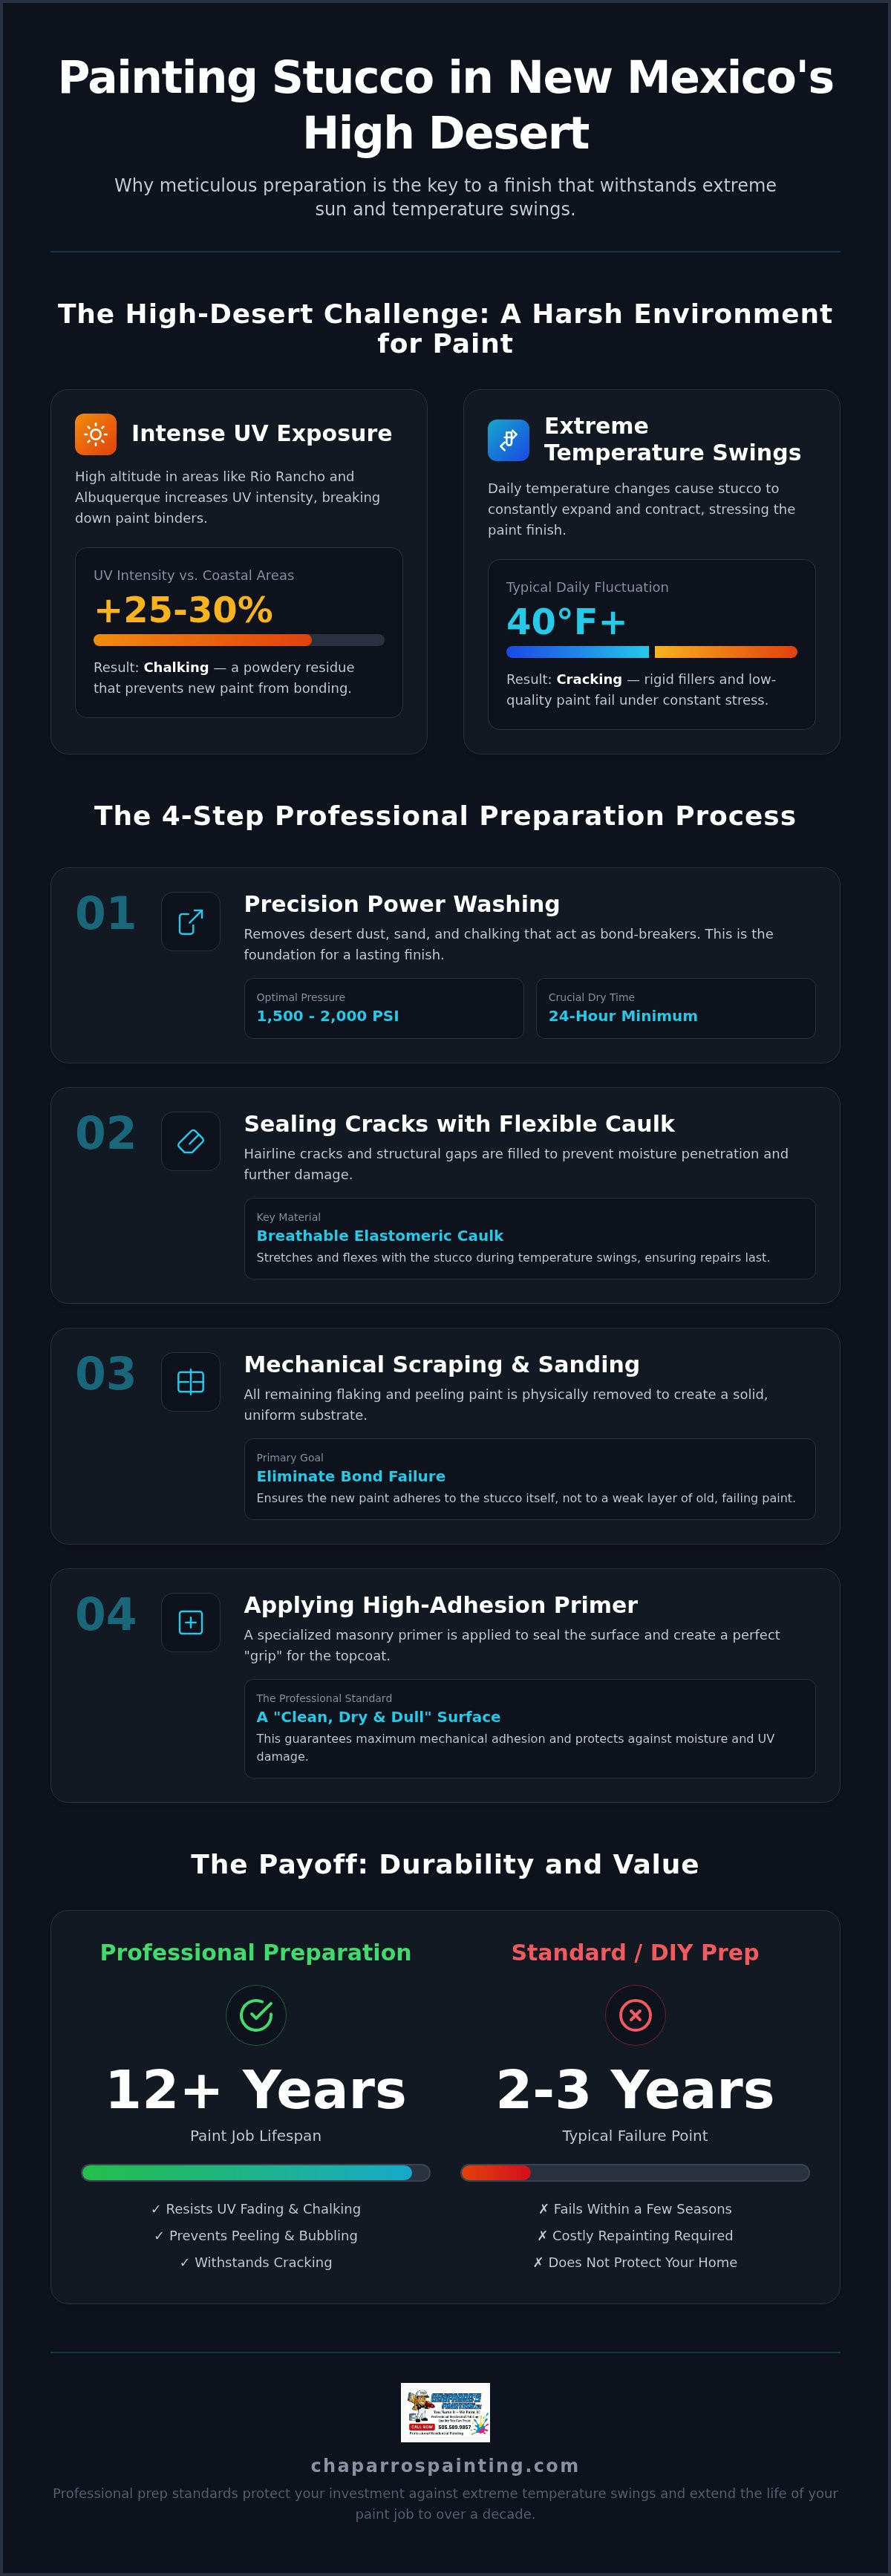
In the high-desert environment of New Mexico, prep work is more than a simple cleaning step. It is the mechanical and chemical stabilization of the substrate. When you understand how to prepare stucco for painting, you are essentially building a defensive barrier against one of the harshest climates in the country. Rio Rancho’s high altitude means our homes sit over 5,000 feet closer to the sun than coastal properties. This proximity increases UV intensity by 25 to 30 percent, which aggressively degrades the binders and resins that hold paint together. Traditional stucco surfaces require a specific approach to handle these conditions.
Skipping these foundational steps is a costly mistake. While a professional job can last up to 12 years, a poorly prepped surface often begins peeling and bubbling within 24 to 36 months. The process of how to prepare stucco for painting correctly focuses on achieving a surface that is "clean, dry, and dull." A clean surface has no dust or sand to break the bond. A dry surface prevents trapping moisture that causes blisters. A dull surface ensures the new coating has enough texture to achieve a mechanical grip. Achieving all three is the only way to guarantee a bond that lasts a decade or more.
UV Radiation and the Chalking Phenomenon
High-altitude sun causes a chemical reaction called chalking. This is the white, powdery residue you see on older or neglected paint jobs. It happens when intense UV light destroys the paint's resin, leaving the pigment unsupported on the surface. You can check for this using a simple hand test. Run your palm across your exterior wall. If a white powder transfers to your skin, the surface is too oxidized for new paint. Painting over this powder is like painting over loose sand; it causes immediate delamination because the new coat cannot bond to the solid wall beneath.
Temperature Fluctuations and Surface Stress
New Mexico is famous for 40-degree daily temperature swings. Your home literally expands and contracts every 24 hours. This constant movement puts immense stress on the exterior finish. Rigid prep materials and standard hardware-store fillers often crack under this pressure because they lack the flexibility to move with the house. This is why specialized exterior painting Rio Rancho professionals focus on elastic, high-performance solutions. Prep must account for this seasonal and daily expansion to prevent new cracks from forming the moment the temperature drops at night.
Step 1: Deep Cleaning and Powerwashing Without Damaging the Substrate
Cleaning is the foundational stage of how to prepare stucco for painting. In our high-desert environment, wind-blown sand and fine dust are constant. These microscopic particles act as a bond-breaker between the stucco and your new coating. If you don't remove them, the paint sticks to the dust instead of the wall, leading to early peeling. A thorough cleaning ensures the substrate is ready to accept a new finish.
Pressure settings are critical for residential homes. While it's tempting to blast the surface with maximum force, excessive pressure can "etch" or gouge soft stucco. We recommend a "sweet spot" of 1,500 to 2,000 PSI. This range provides enough force to strip away chalking and dirt without compromising the structural integrity of the surface. It's about precision, not just power.
Despite the low humidity in Rio Rancho and Albuquerque, you must respect a 24-hour drying window. Stucco is a porous material that holds moisture deep within its layers. Even if the surface feels dry to the touch, internal moisture can remain trapped. If you paint too soon, that water will turn to vapor when the sun hits the wall, causing the new paint to blister and bubble. Patience here is essential for a 10-year finish.
North-facing walls or areas shaded by deep porch roofs often harbor mold or mildew. A standard water blast usually isn't enough to kill these spores. You should use a specialized chemical cleaner or a mild bleach solution to neutralize the growth. This step prevents organic material from growing back through your new paint and ruining the aesthetics of your home.
The Proper Powerwashing Technique
Always utilize a top-down washing method to ensure dirt and debris flow away from clean areas and to prevent permanent streaking on the substrate. A 40-degree wide-fan tip is the safest choice for residential stucco because it distributes water pressure evenly. Avoid the 0-degree red tip, as it can cut through stucco like a knife. Before starting, cover your HVAC units with plastic and saturate nearby landscaping with fresh water to protect your plants from runoff.
Addressing Hidden Contaminants
Look for efflorescence at the base of your walls. These white, crusty salt deposits form when moisture pulls minerals through the stucco; they must be scrubbed away with a stiff brush before painting. Near driveways or outdoor kitchens, use a professional degreaser to remove oily films that prevent paint adhesion. For homeowners who aren't comfortable handling high-pressure equipment, scheduling a professional house powerwashing New Mexico service ensures the job is done safely. If you want to ensure every contaminant is removed before you begin, consulting with a seasoned craftsman can provide the peace of mind you need.
Repairing Stucco Cracks and Surface Defects for a Seamless Finish
Once your home is clean and dry, the focus shifts to structural integrity. Stucco is a durable material, but it isn't invincible. Over time, the constant expansion and contraction of the high-desert climate causes the surface to fatigue. Repairing these defects is a core part of how to prepare stucco for painting. If you simply paint over a crack, the gap will reappear within months as the house moves. You must address the underlying issue to ensure a seamless, long-lasting finish.
Start by inspecting the entire exterior for different types of damage. We generally categorize these into hairline cracks, which are 1/16th of an inch or smaller, and structural gaps. You should also look for "spalling," where the stucco has become loose or started to crumble away from the lath. Use a putty knife or a wire brush to remove this failing material until you reach a solid, stable layer. Finding a firm foundation is the only way to ensure your patches don't fall off later.
Don't overlook the transition points where stucco meets other materials. Seal the gaps around windows, doors, and light fixtures with high-grade elastomeric caulk. These areas are prime targets for moisture intrusion. In New Mexico, wind-blown sand can also work its way into these openings, creating a "wedge" that forces the stucco further away from the frame. Proper sealing keeps the elements out and keeps your energy bills down.
Identifying and Sealing Hairline Cracks
Hairline cracks might seem cosmetic, but they are entry points for moisture and fine desert silt. Even a tiny opening allows water to seep behind the finish, which eventually leads to bubbling paint. For these small defects, we use brushable elastomeric sealants. These products are designed to "breathe" and stretch, accommodating the 40-degree temperature swings common in Rio Rancho. Always allow these sealants to cure fully before moving on to the primer coat. This usually takes a few hours, but check the product specs for the exact timing.
Invisible Texture Matching
The biggest challenge in stucco repair is making the patch disappear. If you apply a smooth patch to a textured wall, it creates a "flashing" eyesore that shows up even after two coats of paint. Achieving a professional look requires "dabbing" or "flicking" the patch material with a brush or sponge to mimic the surrounding finish. It takes a steady hand and years of practice to get right. We take great pride in our stucco repair Rio Rancho NM standards because a repair should be invisible to the naked eye. When you know how to prepare stucco for painting with a craftsman's eye for detail, the final result looks like a brand-new home rather than a patched-up one.
The Adhesion Phase: Scraping, Sanding, and Choosing UV-Resistant Primers
After your home is clean and the repairs are cured, you must ensure the surface is mechanically sound. This is where the physical labor of how to prepare stucco for painting becomes most evident. We use wire brushes and heavy-duty scrapers to remove every flake of loose or failing paint. If you leave a single loose edge, the tension of the new paint drying will pull that old layer away from the wall. This leads to immediate peeling. It’s a tedious process, but it’s the only way to guarantee a bond that lasts more than a season.
Before any primer hits the wall, we focus on protection. Masking is a critical part of a professional "clean site" policy. We carefully cover stone accents, windows, and decorative wood elements with tape and plastic. In the Rio Rancho area, many homes feature beautiful natural wood or stone that can be easily ruined by overspray. Taking the time to mask properly reflects the quiet pride we take in our craftsmanship; we treat your property with the same respect we would our own.
The Art of Feather-Sanding
When you scrape away old paint, you're often left with a sharp, visible edge where the old coating meets the bare stucco. If you paint directly over this, you'll see a "crater" or an outline in the final finish. Feather-sanding is the process of tapering these edges down to a zero-degree slope. This creates a smooth transition that becomes invisible once the topcoat is applied. For stucco surfaces, we typically use a 60 to 80 grit sandpaper to blend the edges without smoothing out the natural texture. For wood trim or doors, we move to a finer 100 or 120 grit to ensure a smooth, professional bond.
Priming for the High Desert
New Mexico's stucco is incredibly porous and often has a high alkalinity, especially in areas with new patches. High-solids masonry primers are non-negotiable here. A sealing primer blocks the high pH of new stucco from "burning" through your color, while a bonding primer creates a tacky surface for the topcoat to grip. Don't be misled by "paint and primer in one" products. In our climate, those products rarely have the solids content required to seal desert stucco effectively. This stage is also the time to prime wood elements like vigas or prepare for gate staining Rio Rancho projects. If you want a finish that truly stands up to the intense sun, request an itemized prep estimate to see exactly how we protect your home’s exterior.
The Chaparro’s Standard: Professional Prep for Rio Rancho and Albuquerque Homes
Jaime Chaparro has spent over 20 years refining the standards of residential painting in the local community. This two-decade history is rooted in a simple philosophy: do the job right the first time. Understanding how to prepare stucco for painting in our unique environment isn't something learned from a manual; it's earned through thousands of hours on-site in Rio Rancho and Albuquerque. We are a residential-only contractor, which means our focus is entirely on the meticulous details required to protect your home. We don't cut corners to meet commercial volume. Instead, we prioritize the quiet pride of craftsmanship that ensures your exterior looks exceptional for years.
Our "clean site" policy is a core part of our professional standard. Prep work is an inherently messy process involving powerwashing, scraping, and sanding. We take proactive steps to protect your home's interior and exterior throughout the entire project. This includes sealing off entry points and carefully masking stone accents, landscaping, and windows. Punctuality, integrity, and cleanliness are the hallmarks of our service. We treat every property with the respect it deserves, ensuring that the only thing we leave behind is a flawless finish.
Transparency is another pillar of the Chaparro's Painting, LLC standard. Our itemized quoting process clearly defines every stage of the prep work. You'll know exactly what to anticipate before the project begins. We never skip steps, and we never rush the curing process. Before the first gallon of paint is even opened, we perform a final, comprehensive inspection. We check every square inch of the substrate to verify that the repairs are seamless and the primer is properly bonded. This disciplined approach is why our finishes consistently outlast the industry average.
A Seasoned Craftsman's Approach
Hiring a locally owned and operated team provides a level of accountability you won't find with national franchises. We are your neighbors, and we value the trust you place in our hands. Our goal is to provide peace of mind through every phase of the service. Before you move forward with your project, it's helpful to review the exterior painting cost Rio Rancho data for 2026. This allows you to budget effectively for a professional-grade transformation that protects your home from the intense high-desert sun.
Your Path to a Lasting Finish
The journey from weathered, chalking stucco to a beautiful, protected exterior is a methodical one. It starts with a free, transparent estimate where we explain how to prepare stucco for painting based on your home's specific needs. We offer honest, straightforward advice without any high-pressure sales tactics. If you're ready for a finish that stands up to New Mexico's extreme temperature swings and lasts for a decade or more, we invite you to start a conversation with us. Let our 20 years of local expertise work for you.
Protect Your Home for the Next Decade
A beautiful exterior starts long before the first brushstroke. In New Mexico, understanding how to prepare stucco for painting is the only way to combat intense UV radiation and daily temperature swings. By focusing on deep cleaning, elastomeric repairs, and high-solids masonry primers, you create a surface that won't peel or chalk prematurely. These steps are the structural defense your home needs to maintain its value and curb appeal.
As a residential stucco specialist with over 20 years of local Rio Rancho experience, Jaime Chaparro personally ensures that every project meets our meticulous standards. We take pride in being an owner-operated team that prioritizes craftsmanship and transparency over volume. You don't have to navigate the complexities of desert prep work alone. We are here to provide the steady, reliable partnership your home deserves.
Ready to see the difference professional preparation makes? Get Your Free, Transparent Exterior Painting Estimate Today and start your journey toward a flawless, long-lasting finish. Your home is your most significant investment; let's make sure it's protected for years to come.
Frequently Asked Questions
How long does professional stucco prep work typically take?
Professional preparation usually takes between one and three days for a standard residence in Rio Rancho or Albuquerque. This timeline accounts for the initial powerwash and the necessary 24-hour drying window. If your home has extensive cracking or spalling, the repair phase might extend the schedule. We prioritize thoroughness over speed to ensure the substrate is perfectly stabilized before any paint is applied.
Can I just paint over hairline cracks in my stucco?
You should never simply paint over hairline cracks. While the paint might hide the gap initially, the constant expansion and contraction of our high-desert climate will cause the crack to reappear quickly. We use brushable elastomeric sealants that move with your home. This is a vital part of how to prepare stucco for painting because it prevents moisture from seeping behind the finish and causing structural damage later.
Why is my exterior paint peeling only on the south side of the house?
The south side of your home receives the most direct sunlight and intense UV radiation throughout the day. At an elevation of over 5,000 feet, the sun breaks down paint binders much faster than in lower altitudes. This causes the finish to become brittle and lose its adhesion. Without professional-grade UV-resistant primers and meticulous prep work, the south and west walls will always be the first areas to show signs of failure.
Is powerwashing mandatory before painting stucco in New Mexico?
Powerwashing is a mandatory step for every exterior project we handle in Bernalillo and Santa Fe. Wind-blown sand and fine desert dust settle into the porous texture of your stucco, acting as a barrier that prevents paint from sticking. We use a specific pressure range of 1,500 to 2,000 PSI to strip away these contaminants without gouging the surface. Skipping this step almost guarantees the paint will peel within a few years.
What is the best time of year for stucco prep in Rio Rancho?
The optimal seasons for exterior work in the Albuquerque metro area are spring and fall. Specifically, April through June and October through early December offer the most stable temperatures. We avoid the extreme heat of mid-summer and the freezing nights of winter, as both can interfere with how primers and paints cure. Consistent temperatures help the materials bond correctly to the surface, ensuring a finish that lasts for a decade or more.
How do I know if my stucco has 'chalking' issues?
You can identify chalking issues by performing a simple "hand test" on your exterior walls. Run your palm firmly across the stucco; if a white, chalky powder transfers to your skin, the previous paint's resin has degraded. This powder is a major hurdle when learning how to prepare stucco for painting. It must be completely removed through powerwashing and scrubbing, or the new coat will fail to bond to the solid wall.
Do you include stucco repair in your standard painting estimates?
Yes, stucco repairs are a standard part of our transparent, itemized estimates. We don't believe in hidden costs or skipping the foundational work that makes a paint job last. Jaime Chaparro brings over 20 years of local experience to every evaluation, ensuring we identify every hairline crack and structural gap. Our goal is to provide a complete solution that beautifies your home while protecting it from the harsh New Mexico elements.
What happens if you paint over wet or damp stucco?
Painting over damp stucco traps moisture inside the porous material. When the New Mexico sun hits the wall, that trapped water turns into vapor and expands, forcing the new paint to pull away from the surface. This results in unsightly blistering and bubbling. Even in our dry climate, we strictly enforce a 24-hour drying period after powerwashing to ensure the substrate is completely moisture-free before the priming phase begins.


