

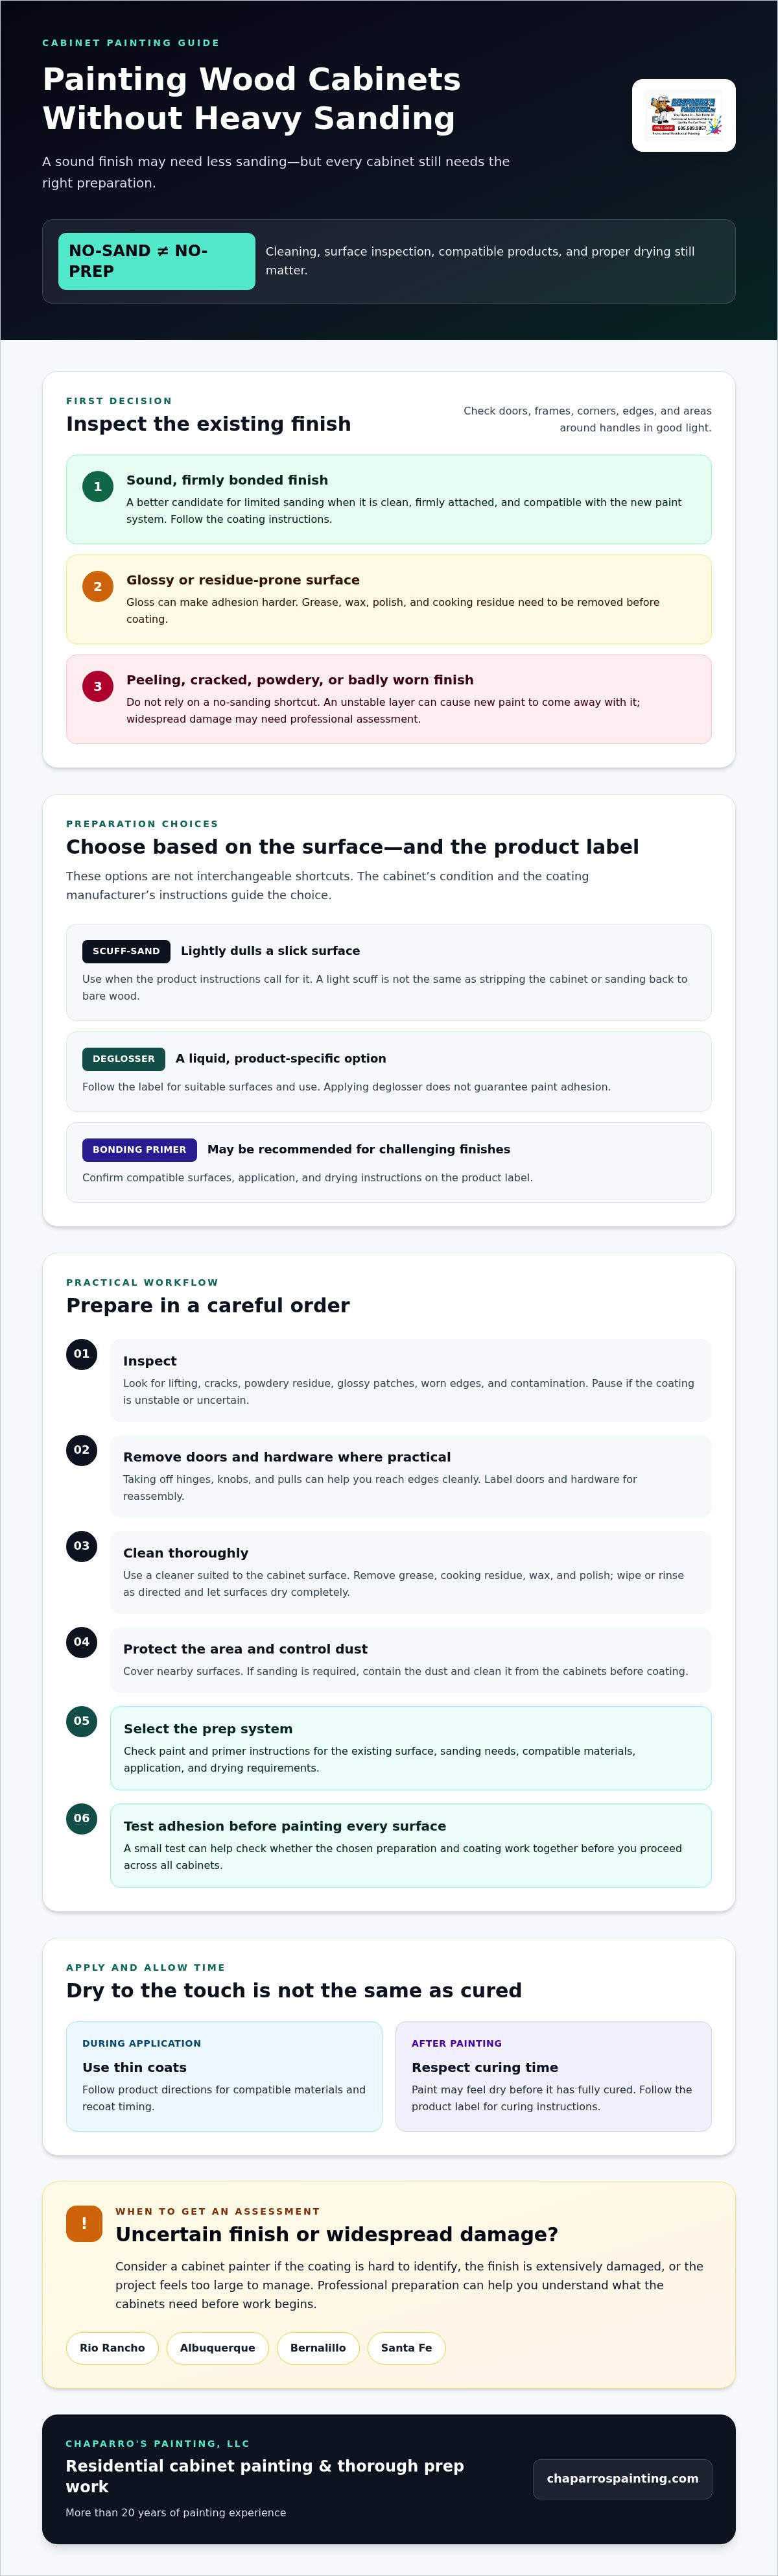
What if you could skip heavy sanding without risking a peeling finish? Painting wood cabinets without sanding can work when the existing finish is sound and the surface is properly cleaned. But “no-sand” doesn’t mean “no-prep.” Grease, glossy coatings, scratches, and peeling paint can all affect adhesion, so inspect the cabinets before you begin.
This guide explains when you may be able to minimize sanding, when a light scuff or more extensive preparation is needed, and how to clean, prime, and paint in a practical order. You’ll learn why cleaning and a suitable bonding primer matter, and why paint that feels dry may still need time to cure. If the finish is damaged, greasy, or difficult to identify, a professional assessment can help you avoid redoing the work. Chaparro's Painting, LLC provides residential cabinet painting and thorough prep work, drawing on more than 20 years of painting experience.
Key Takeaways
- Check the existing finish for damage, grease, and gloss before deciding how much sanding is needed.
- For painting wood cabinets without sanding, follow a careful prep sequence and test adhesion before painting every surface.
- Compare light scuff-sanding, deglosser, and primer-led preparation based on cabinet condition and coating instructions.
- Apply thin coats and follow the product label for compatible materials, recoat timing, and curing.
- Consider a cabinet painter if the finish is extensively damaged, the coating is uncertain, or the project feels too large to manage.
Can You Paint Wood Cabinets Without Sanding? Start With the Existing Finish
Yes, painting wood cabinets without sanding can work when the existing coating is clean, firmly bonded, and compatible with the new paint system. It isn’t a reliable shortcut for every cabinet. The finish’s condition, any grease or polish on the surface, and the products you plan to use all affect adhesion.
Short answer: You may be able to skip extensive sanding when the cabinet finish is sound and the coating manufacturer allows it. Cleaning and any preparation required by the product still matter. Peeling, powdery, or badly worn surfaces need more attention before painting.
Light scuff-sanding is different from stripping a cabinet or sanding it back to bare wood. A light scuff dulls a slick surface to help the next layer grip; it doesn’t remove the entire finish. Whether you can skip even that step depends on the coating instructions and the cabinet’s condition. For background on the different types and purposes of finishes, see this overview of wood finishing.
Which cabinet finishes may accept paint with limited sanding?
A coating that feels firm and shows no lifting, cracking, or powdery residue is a better candidate for limited sanding than a finish that’s breaking down. Check door edges, corners, and areas around handles, where wear can be easier to spot. Glossy finishes can be harder for paint to grip, so don’t assume a surface is ready just because it looks clean.
Check the paint and primer manufacturer’s instructions before deciding to skip sanding. Some systems allow minimal sanding on certain surfaces; others call for scuffing glossy finishes. If you can’t identify the coating, avoid guessing. The right preparation depends on the products being used as well as the surface.
When should you avoid a no-sanding shortcut?
Pause if you find loose, flaking, cracked, or badly worn coating. Painting over an unstable layer won’t fix the underlying problem, and the new paint may come away with it. Grease, wax, furniture polish, and cooking residue also need to be removed. These contaminants can interfere with adhesion even when the cabinet looks intact.
Before choosing a prep method, inspect the doors and cabinet frames in good light. Ask:
- Is the coating firmly attached across the surface?
- Are there glossy areas, worn edges, or signs of residue?
- Can you identify the existing finish and confirm the new coating is suitable for it?
If the finish or cabinet material is uncertain, or damage is widespread, get a professional assessment before starting. Chaparro's Painting, LLC provides residential cabinet painting and thorough prep work in Rio Rancho, Albuquerque, Bernalillo, and Santa Fe. An assessment can help you understand the preparation the cabinets may need before you commit time to the project.
How to Prepare Wood Cabinets for Painting Without Heavy Sanding
A dependable result starts before the first coat. This process helps you limit unnecessary sanding while still giving the new coating a clean, properly prepared surface. Read the paint and primer labels first, since preparation steps vary by product and existing finish.
Clean, inspect, and protect the work area
Kitchen cabinets collect residue in easy-to-miss places, especially around handles, edges, and areas near the stove. Choose a cleaner suited to the cabinet surface and follow its directions. Don’t coat over grease or polish. Wipe or rinse as directed, then let every surface dry completely.
Protect nearby surfaces and keep dust from settling on the cabinets after cleaning. A clean surface can pick up debris quickly, so check it again before applying primer or paint.
Choose between scuff-sanding, deglosser, and primer
These are preparation options, not interchangeable shortcuts. Light scuff-sanding may help dull a glossy surface when the coating instructions call for it. A liquid deglosser is another product-specific option, but using one doesn’t guarantee that paint will adhere. A bonding primer may be recommended for a challenging finish. Follow the labels for compatible surfaces, application, and drying instructions.
Use this sequence to prepare the cabinets:
- Inspect the finish. Check doors, frames, corners, and worn areas for lifting, cracks, or residue. Pause if the coating is unstable.
- Remove doors and hardware where practical. Take off hinges, knobs, and pulls to reach edges cleanly. Label each door and its hardware so reassembly is straightforward.
- Clean thoroughly. Remove grease, cooking residue, wax, or polish with a suitable cleaner. Wipe or rinse as directed, and allow the surface to dry fully.
- Protect and control dust. Cover nearby surfaces. If sanding is required, keep dust contained and clean it from the cabinets before proceeding.
- Choose the preparation method. Scuff-sand, use a deglosser, or apply a bonding primer only as directed for the existing surface and selected coating system.
- Test before committing. Apply the planned preparation and coating steps to a small, inconspicuous area, then let it dry as directed.
A test patch helps you check whether the selected products are compatible with the existing finish and whether the new coating adheres before you cover every cabinet. If it lifts or scratches off easily, stop and reassess rather than continuing across the kitchen.
Painting wood cabinets without sanding still takes careful preparation. If you’d like help assessing the cabinet condition before choosing a method, residential cabinet painting is one option to discuss with Chaparro's Painting, LLC.
Compare No-Sand Cabinet Painting Options and Their Trade-Offs
There isn’t one preparation method that suits every cabinet. The right choice depends on the cabinet material, the condition and type of its existing coating, and the instructions for the products you plan to use. Compare the trade-offs before choosing a method for painting wood cabinets without sanding.
| Method | Effort and suitable surfaces | Instructions and adhesion test |
|---|---|---|
| Light scuff-sanding | Requires hands-on work and dust control. It can dull a sound, glossy coating and help prepare it for the next layer. | Use it if the coating instructions call for scuffing. Test the full preparation and coating system on a small, hidden area first. |
| Liquid deglosser | May be an option for specific surfaces when sanding is being minimized. It still takes careful application and cleanup. | Follow the product label for approved surfaces, application, and drying. Don’t assume it guarantees adhesion; test the system first. |
| Primer-led preparation | A suitable bonding primer may be part of the plan for a challenging but stable existing finish. It won’t repair loose paint or replace cleaning. | Confirm the primer is compatible with both the cabinet surface and topcoat. Test the complete system before proceeding. |
What does each preparation method solve?
Scuff-sanding changes the surface by lightly dulling it; it isn’t the same as stripping the finish. A deglosser is a product-specific alternative, not a universal replacement for sanding. Primer is one layer in a coating system. None of these options makes grease, wax, or unstable paint safe to coat over. Clean first, and address any failing finish before choosing among them.
How do you check whether the coating is ready?
Apply the chosen preparation and coating steps to an inconspicuous patch, using the same products and sequence planned for the cabinets. Follow the label’s stated drying and curing times before assessing it. A surface can feel dry before it has fully hardened, so don’t judge the test too soon.
Once the recommended time has passed, check for lifting, easy scratching, or persistent tackiness. If you see any of these signs, stop. Recheck surface cleanliness, material compatibility, and product directions rather than applying more coats over a questionable result.
How to Paint Wood Cabinets Without Sanding: Apply and Cure the Finish
Once the surface is prepared and your test patch has performed as expected, follow a steady application sequence. Painting wood cabinets without sanding still requires close attention to the coating instructions. They determine which products can be used together, whether primer is needed, how long to wait between coats, and what ventilation is required.
Apply primer and cabinet paint according to product directions
Use primer when the selected coating system or cabinet surface calls for it. Apply it evenly, paying attention to door edges, recessed profiles, and cabinet frames. Avoid loading the brush or roller with excess product. Heavy application can leave drips and uneven texture that may show through the finish.
After any required primer has dried as directed, apply cabinet paint in thin, even coats. Work methodically across each door and frame, keeping a wet edge where practical and checking corners for runs. Lighter coats help limit drips and visible brush or roller marks. Don’t add more paint simply to cover an area in one pass; follow the label for application and recoat guidance.
- Confirm primer and paint are compatible.
- Use the applicator recommended for the coating and surface.
- Check edges and profiles for missed spots or excess paint before moving on.
- Follow the product label for recoat windows and ventilation.
For broader home painting needs beyond cabinets, Chaparro’s Painting, LLC also offers residential interior painting. Learn more about professional interior painting in Rio Rancho.
Protect the finish during drying and reassembly
Dry to the touch, ready for another coat, and fully cured mean different things. A surface may feel dry while the coating is still soft underneath. Follow the label’s recoat instructions, then allow the full recommended cure period before reinstalling hardware, closing doors against frames, or placing items back inside cabinets.
Handle doors carefully during this stage. Early contact can leave marks, impressions, or sticking, even if the surface no longer feels wet. Keep the work area ventilated as directed, and avoid putting the finish under normal kitchen use until the product guidance says it’s ready. Patience protects the preparation and application work that came before.
For help planning cabinet painting, ask Chaparro’s Painting about cabinet painting.
When to Call a Cabinet Painter in Rio Rancho or Nearby
DIY may be less practical if cabinet doors are extensively scratched, coatings are peeling, grease is difficult to remove, or you can’t identify the existing finish. A large kitchen can also involve substantial detailed work, from preparing door profiles to protecting nearby surfaces. In these situations, a professional assessment can help clarify what preparation is needed before you commit to painting wood cabinets without sanding.
Chaparro’s Painting, LLC provides residential cabinet painting and thorough prep work in Rio Rancho, Albuquerque, Bernalillo, and Santa Fe. Ask for clear expectations about the surface condition, planned work, and how the finish will be protected while it dries and cures.
What should a cabinet-painting estimate explain?
A useful estimate should describe the work in terms you can understand. Ask how the painter will assess the existing coating, identify damage, and determine which preparation or repairs are needed. Clarify which cleaning, preparation, primer, and coating steps are included, and how nearby areas will be protected.
Discuss practical details, too. Confirm whether doors and hardware will be removed and reinstalled, who will handle those steps, and what drying and curing guidance applies to the selected coating. Ask which product instructions will guide recoat timing and when cabinets can return to normal use. These questions help you compare plans, not just end results.
Is painting or staining the better fit for your cabinets?
Paint gives cabinets an opaque finish that covers the wood’s natural color and grain. Stain changes the wood’s tone while leaving more of its grain visible. The best fit depends on the cabinet material, its condition, and the appearance you want. If you’re considering a stained finish instead, see professional wood staining in Rio Rancho.
You don’t need to settle on a no-sanding approach before the cabinets have been assessed. A conversation can help you understand what the surface may require and what to expect from the work. If your home is in Rio Rancho, Albuquerque, Bernalillo, or Santa Fe, discuss your cabinet painting project with Chaparro’s Painting.
Choose the Preparation That Gives Your Cabinets a Sound Start
Painting wood cabinets without sanding can be suitable when the existing finish is sound and the coating system allows limited sanding. It still takes careful cleaning and surface preparation. If the finish is peeling, damaged, or uncertain, pause and assess it before applying paint. A small test patch can reveal adhesion problems before you commit to the full project.
For a dependable finish, follow product instructions from preparation through curing. Thin, even coats and patience before reassembly help protect the work. If you’re unsure which approach fits your cabinets, a professional assessment can make the next steps clearer.
Chaparro’s Painting offers residential cabinet painting and thorough prep work, backed by more than 20 years of painting experience. Discuss your cabinet painting project with Chaparro’s Painting to talk through your cabinet condition and expectations. If you’re in Rio Rancho, Albuquerque, Bernalillo, or Santa Fe, get in touch to discuss your project.
Frequently Asked Questions
Can you paint wood cabinets without sanding them at all?
Sometimes, but it depends on the cabinet’s existing finish and the coating system. Painting wood cabinets without sanding may be suitable if the finish is clean, firmly bonded, and compatible with the products you choose. Some manufacturers still recommend light scuff-sanding, especially on glossy surfaces. Check the product instructions and test the full preparation and coating system on a small, inconspicuous area before painting all the cabinets.
What happens if you paint cabinets without cleaning or sanding them?
Paint applied over grease, wax, polish, or cooking residue may not adhere properly and can peel, lift, or develop an uneven finish. Cleaning is essential, even if sanding can be reduced or skipped. Sanding helps prepare some glossy or worn surfaces, but it isn’t automatically required for every cabinet. Inspect the existing coating and follow the chosen products’ directions rather than painting over contamination or damage.
Does a deglosser work instead of sanding on kitchen cabinets?
A deglosser can be an option for certain surfaces, but it isn’t a universal substitute for sanding or a guarantee of adhesion. Use it only if its label indicates that it’s suitable for your cabinet finish, and follow the instructions for application and drying. Clean the surface first, then test the planned coating system in an inconspicuous spot. If the coating lifts or scratches easily, stop and reassess.
Do wood cabinets need primer before painting?
Not every cabinet requires primer, but a primer may be part of the coating system or recommended for a challenging existing finish. Check the paint and primer instructions to confirm that the products are compatible with each other and with the cabinet surface. Primer won’t solve problems caused by grease, loose paint, or a damaged coating. Clean and assess the cabinets first, then use primer as directed.
How can I tell whether my cabinet paint is adhering properly?
Test the preparation and coating system on a small, inconspicuous area before painting every cabinet. Let the test patch dry and cure for the time stated on the product label before checking it. Look for lifting, easy scratching, persistent tackiness, or other signs that the coating isn’t holding as expected. If you see a problem, pause and review surface cleanliness, product compatibility, and preparation before continuing.
How long should painted cabinets cure before I use them normally?
Follow the coating label for its drying, recoat, and full-cure guidance. These stages aren’t interchangeable: paint can feel dry to the touch while remaining soft and vulnerable to marks. Avoid reinstalling hardware, closing doors against frames, or returning items to cabinets until the product guidance allows it. Handle doors gently during curing, since early contact can leave impressions or cause surfaces to stick.
When should I hire a professional to paint wood cabinets?
Consider a professional if coatings are extensively peeling or damaged, the existing finish is uncertain, grease is difficult to remove, or the project feels too large to manage. Ask how the painter will assess surfaces, what preparation and coating steps are included, and how drying and curing will be handled. Chaparro’s Painting offers residential cabinet painting and thorough prep work, with more than 20 years of experience in Rio Rancho, Albuquerque, Bernalillo, and Santa Fe.


