

A professional-grade paint job is won or lost before you ever dip a brush into a bucket. While many homeowners focus on choosing the perfect nature-inspired palette, the real secret to a flawless finish lies in the invisible work that happens first. Learning exactly how to prepare a room for painting is the only way to ensure your new color adheres properly and stays vibrant for years. It is common to feel overwhelmed by the time commitment or the fear of getting paint on your expensive flooring. You might even feel uncertain about how to fix those small drywall cracks so they don't reappear a month later.
We understand that your home is your most significant investment, and you want it treated with respect and precision. This guide outlines the exact, methodical steps used by seasoned craftsmen to ensure a clean home throughout the process and a smooth surface for every coat. We will walk you through everything from protecting your furniture to mastering basic drywall repairs. By the end of this article, you will have a clear roadmap to achieving a high-quality result that adds real value and beauty to your living space.
Key Takeaways
- Understand why professional painting is 80% preparation and how these invisible steps determine the longevity and quality of your finish.
- Master furniture protection techniques and learn why canvas drop cloths are the superior choice for keeping your flooring pristine.
- Discover how to prepare a room for painting by identifying and repairing common drywall defects like nail pops and stress cracks.
- Learn why washing walls is a non-negotiable step for paint adhesion and how to select the correct tape for sharp, professional lines.
- Identify when a project's complexity warrants professional equipment and expertise to ensure a clean, stress-free transformation.
Why Preparation is the Most Critical Step in Interior Painting
Professional painting is often misunderstood as a simple act of applying color. In reality, the application is the final victory lap. Knowing how to prepare a room for painting involves a series of technical steps that ensure the surface is chemically and physically ready for a new finish. We treat every room as a unique challenge. A wall isn't just a flat surface; it's a substrate that has collected dust, oils, and minor damage over years of use. If you ignore these factors, even the most expensive paint will fail to look its best.
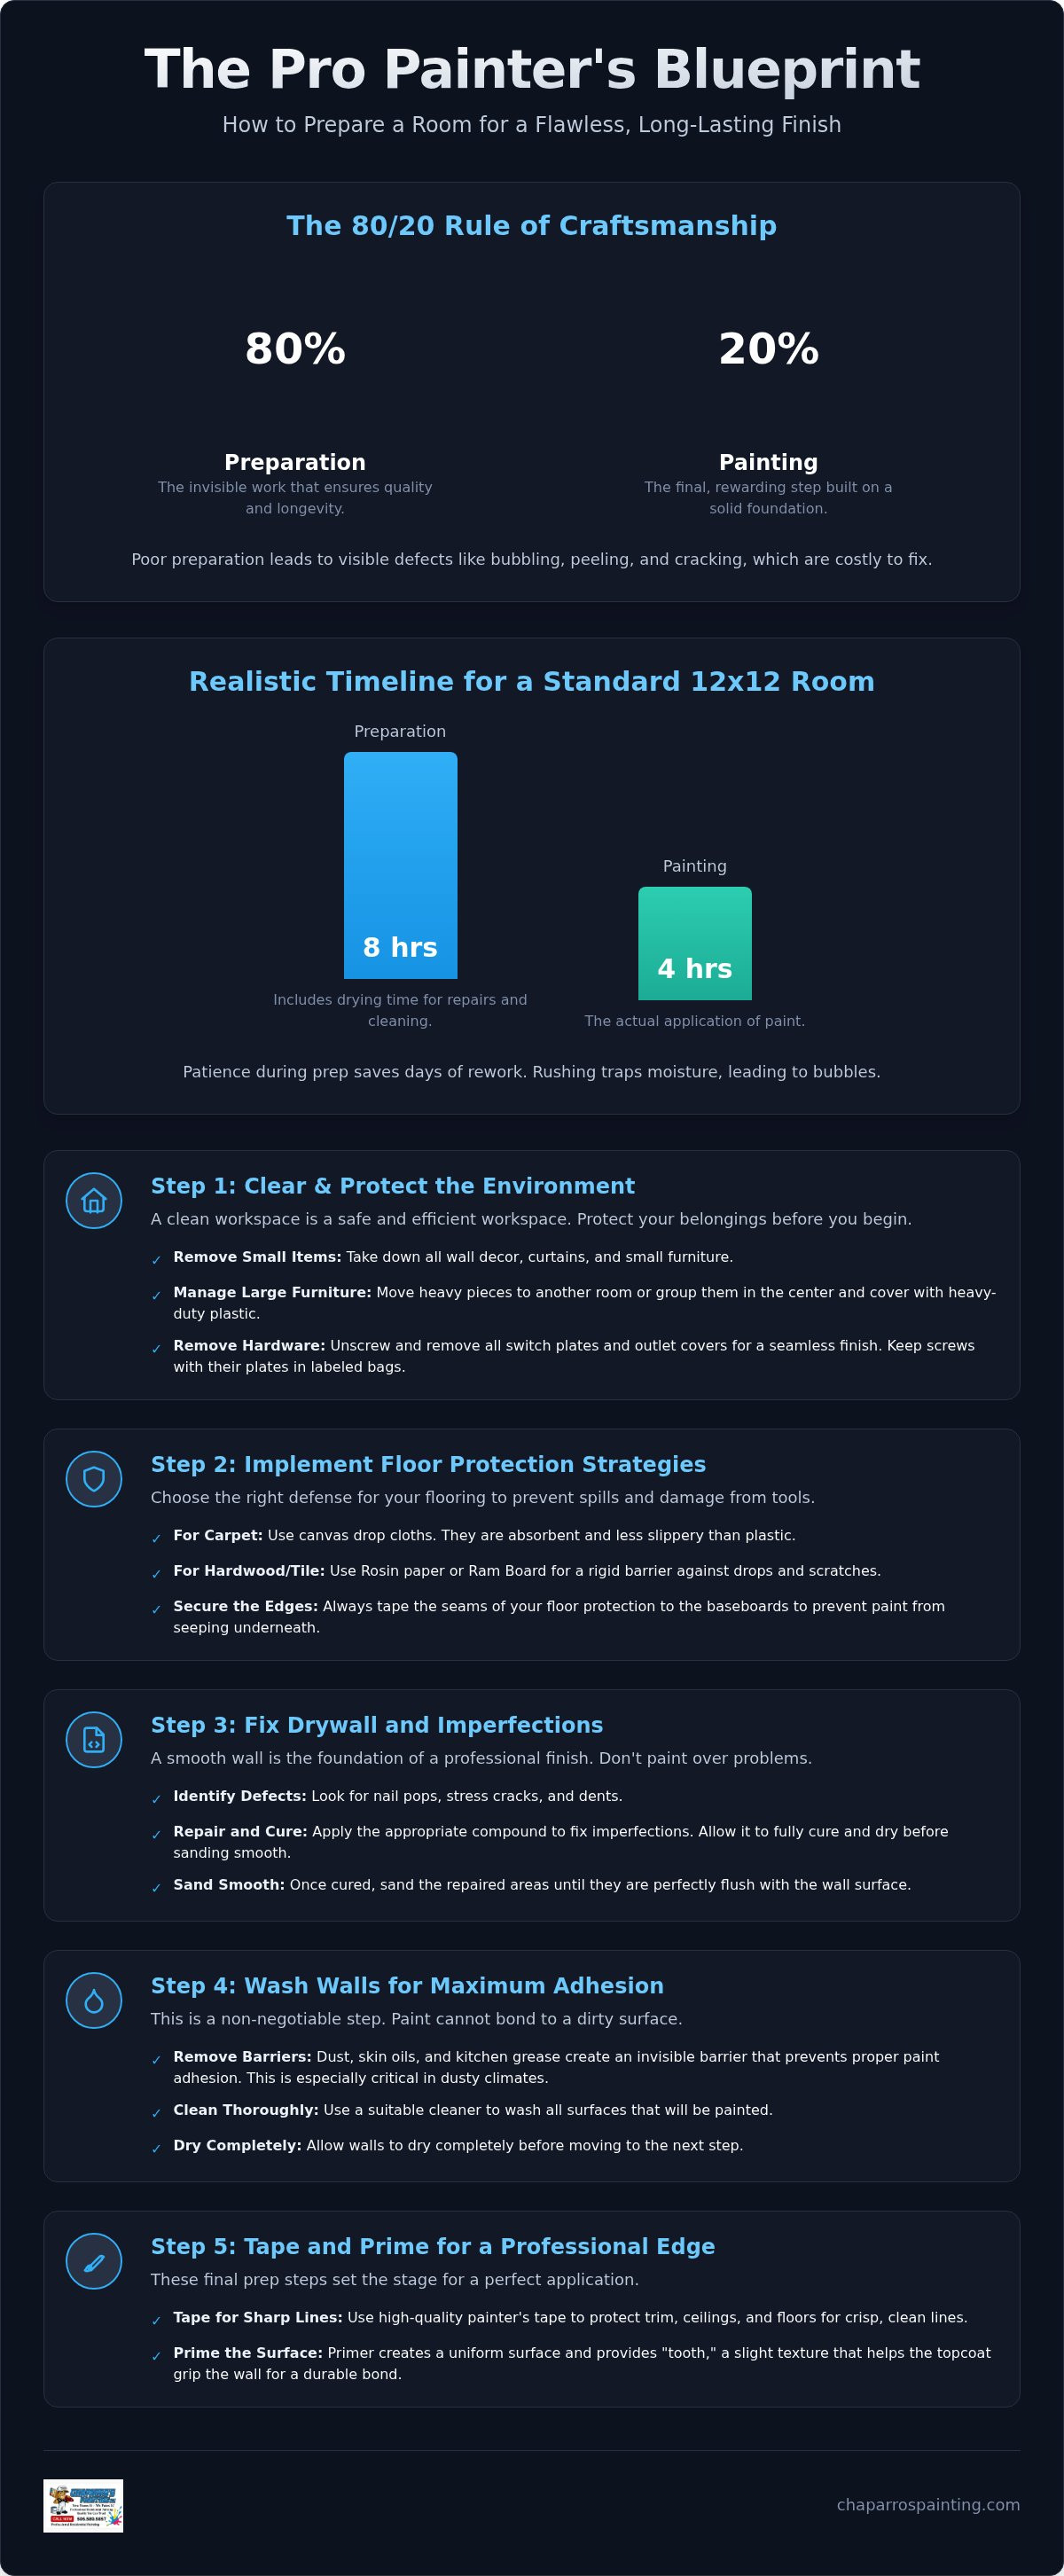
We follow the 80/20 rule of craftsmanship. This means 80% of our energy goes into preparation, while only 20% is spent on the actual painting. Mastering how to prepare a room for painting requires a shift in perspective. You aren't just "getting ready" to paint; you're performing the most vital part of the service. Poor preparation leads to visible imperfections like bubbling, peeling, or "alligatoring," where the paint cracks in a pattern resembling reptile scales. These mistakes are costly and frustrating to fix once the job is finished.
Beyond the technical results, a well-organized workspace offers a psychological benefit. When your floors are protected and your tools are staged, you avoid the frantic mistakes that happen in a cluttered room. A clean environment allows for better focus on the details that matter, such as sharp lines and even coverage. It's about creating a disciplined process that guarantees a predictable, high-quality result every time.
The Science of Paint Adhesion
Paint doesn't just sit on a wall; it bonds to it. Dust, skin oils, and kitchen grease act as invisible barriers that prevent this bond. A critical part of this process is understanding paint primer and how it creates "tooth." This slight texture allows the topcoat to grip the surface properly. In the dry, dusty climate of Rio Rancho and Albuquerque, surface cleanliness is even more vital. Fine desert dust can settle quickly, ruining a finish before it even dries. We focus on removing every layer of debris to ensure long-term durability and a professional bond.
Setting Realistic Timelines for Your Project
Most homeowners underestimate the clock. A standard 12x12 room might take four hours to paint but eight hours to prepare correctly. This includes time for meticulous drywall repairs to set and for cleaned walls to dry completely. We believe in doing the job right the first time. Rushing the drying phase traps moisture under the paint, which eventually leads to bubbling. A seasoned craftsman knows that patience during the prep phase saves days of rework later. If you have significant repairs, expect the timeline to shift as compounds require proper curing before they can be sanded smooth.
Clearing the Space and Environmental Protection
Protecting your home is the first physical step in mastering how to prepare a room for painting. A clear workspace prevents accidents and ensures your belongings remain pristine. We recommend removing all small items, wall decor, and window treatments before work begins. For larger items, you must choose between total removal and the center-room huddle technique. If space allows, moving furniture to another room is ideal. If not, grouping heavy pieces in the center of the room and covering them with heavy-duty plastic provides a solid secondary solution. This creates a wide perimeter for ladders and tools to move freely without risk of collision.
Furniture and Fixture Management
Details matter when you're aiming for a professional look. Remove all switch plates and outlet covers rather than trying to tape around them. This allows the paint to reach behind the plate for a seamless finish. A seasoned craftsman's secret is to tape the screws directly to the back of each plate or store them in labeled plastic bags. This small step saves hours of frustration during re-assembly. For non-removable fixtures like large light pendants or built-in shelving, wrap them tightly in plastic and secure the edges with low-tack tape to prevent dust infiltration.
Floor Protection Strategies
Your flooring requires specific defenses based on its material. For high-traffic areas and carpet, canvas drop cloths are the industry standard. They stay in place better than plastic and absorb small drips rather than letting them puddle. If your home in Rio Rancho or Albuquerque features hardwood or tile, we recommend using Rosin paper or Ram Board. These materials provide a rigid barrier against dropped tools and heavy equipment. Always tape the seams of your floor protection to the baseboards. This prevents paint from seeping under the edge if a spill occurs. If the heavy lifting and meticulous taping feel daunting, our team provides comprehensive prep work services to handle these details for you.
New Mexico's high desert climate introduces unique challenges like fine dust and low humidity. Dust settles quickly here, so we use damp cloths to wipe down surfaces immediately before painting. In lived-in residential spaces, managing this airborne grit is essential for a smooth finish. We also suggest keeping pets and children out of the work zone for their safety and to prevent accidental smudges on fresh walls. Finally, ensure the room is well-lit with portable work lights. Good lighting reveals imperfections that standard overhead fixtures might hide, allowing you to catch errors before the paint dries.
Surface Repair: Fixing Drywall and Imperfections
Paint acts as a spotlight for every flaw on your wall. If you want a smooth finish, you must master how to prepare a room for painting by addressing surface damage first. We see three main culprits in local homes: nail pops, stress cracks, and alligatoring. Nail pops occur when a stud shrinks or shifts, pushing the fastener through the drywall surface. Stress cracks usually appear at the corners of doors and windows due to natural settling. Alligatoring is a pattern of cracking that happens when a new coat is applied over an incompatible or un-prepped old surface. These issues won't disappear under a layer of paint; they will only become more obvious.
Choosing the right filler is essential for a lasting repair. Lightweight spackle works well for tiny nail holes because it dries fast and doesn't shrink much. However, for larger repairs or active cracks, you need joint compound. It provides a stronger bond and is easier to sand over wide areas. In Rio Rancho, it's vital to distinguish between structural settling and water damage. Structural cracks are often thin and diagonal. Water damage usually presents as localized staining, bubbling, or soft spots in the drywall. If the drywall is soft, it must be cut out and repaired before any painting can begin.
Professional Drywall Patching Techniques
For small anchor holes, use a putty knife to press spackle firmly into the void. For larger dents or holes over an inch wide, use self-adhesive mesh tape to bridge the gap. This prevents the repair from cracking as the house shifts. Meticulous drywall repair Rio Rancho homeowners can trust involves applying multiple thin layers of compound rather than one thick coat. Let each layer dry completely. This prevents the "shrinkage" that often ruins DIY repairs.
The Art of Sanding
Sanding is where the repair becomes invisible. Start with 120-grit sandpaper to remove high spots. Finish with 220-grit for a glass-smooth surface. The goal is to feather the edges, blending the repair into the surrounding wall so there is no detectable hump. If you skip this, the repair will flash, showing through the paint as a different texture. To manage the mess, we recommend using a vacuum-attached sander. If you use traditional blocks, keep a damp cloth nearby to catch falling dust. Proper dust control keeps your home clean and prevents grit from getting trapped in your fresh paint. Taking these steps ensures the wall looks like a single, continuous surface once the color is applied.
Cleaning, Taping, and Priming for Maximum Adhesion
Once your repairs are sanded smooth, the next phase of how to prepare a room for painting is ensuring the surface is chemically clean. New paint won't stick to dust or oils. It's that simple. We often see DIY jobs fail because this step was rushed or skipped entirely. A clean substrate is the difference between a finish that lasts a decade and one that peels in a year.
The Cleaning Protocol
Standard soap and water aren't enough for high-use areas. For kitchens, we use TSP (Trisodium Phosphate) to cut through heavy grease and soot that accumulates near stoves. If you have persistent stains from water or ink, clean them thoroughly before moving forward. In our dry New Mexico climate, moisture evaporates quickly, but you still must ensure the wall is bone-dry. Applying tape or primer to a damp wall is a recipe for failure. We recommend waiting at least two hours after a deep clean before proceeding to the next step.
Precision Taping Tips
When learning how to prepare a room for painting, many people overlook the nuances of tape selection. Low-tack tape is best for delicate surfaces or fresh paint, while high-tack tape works for sturdy baseboards and trim. New Mexico homes often feature heavy wall textures like orange peel or knockdown. This makes getting a straight line difficult. A professional trick is to "seal the edge." After applying the tape, run a damp cloth or a clean putty knife over the edge to press it firmly into the texture. This prevents paint from bleeding underneath. Remove the tape while the paint is still slightly tacky to avoid pulling the dried film off the wall.
Priming: The Foundation of Color
Primer isn't just "extra paint." It is a specialized bonding agent. You need a stain-blocking primer for areas with old water damage or smoke stains. For slick surfaces like those found in cabinet painting or high-gloss trim, use a dedicated bonding primer. This creates the "tooth" necessary for the topcoat to grip. We also suggest tinting your primer toward the final wall color. This improves coverage and reduces the number of coats needed for rich, moody hues. Taking the time to prime correctly ensures that your final color looks exactly as you intended.
When to Hire a Professional for Your Room Prep
Deciding whether to tackle the prep yourself or hire a crew depends on the complexity of your space. While the basics of how to prepare a room for painting are manageable for a single small room, a full home refresh is a different story. Professional painters use high-end equipment like HEPA-filtered sanders to keep your air clean and specialized ladders to reach dangerous heights safely. This equipment isn't just about speed. It's about achieving a level of surface perfection that standard DIY kits can't match. We treat every project with a disciplined approach that values order and clear expectations.
The quality of the prep work directly correlates to how many years your paint will last. A professional understands the chemistry of different substrates and primers. This expertise prevents the common failures we discussed earlier, such as peeling or bubbling. When you invest in expert preparation, you're essentially buying insurance for your paint job. The methodical steps of how to prepare a room for painting often require a level of patience and physical stamina that can quickly overwhelm a busy homeowner. Rushing these steps to save time usually leads to visible imperfections that you'll have to live with for years.
Complex Surface Challenges
High ceilings and vaulted entryways are common in our area, but they are high-risk zones for inexperienced painters. Working on a ladder for hours while performing meticulous sanding is physically demanding and requires strict safety protocols. Intricate crown molding and wainscoting also require hours of fine-detail sanding and caulking that many DIYers tend to rush. If your walls have significant stucco or drywall damage, standard patch kits won't provide the structural integrity you need. Our interior painting Rio Rancho experts know how to handle these Albuquerque-area architectural details with precision and care.
The Chaparro's Painting Difference
At Chaparro's Painting, LLC, we bring over 20 years of industry experience to every project. We don't believe in cutting corners or using flashy marketing language to hide subpar work. Our team focuses on meticulous prep work to ensure professional results that stand the test of time. We understand that having contractors in your home is a disruption, so we maintain a clean, organized workspace from start to finish. You get the peace of mind that comes from a guaranteed, high-quality result without the stress of doing the heavy lifting yourself. Contact Chaparro's Painting today to schedule your professional refresh.
Achieve a Flawless Finish in Your Home
Mastering how to prepare a room for painting is a disciplined process that requires patience and precision. By focusing on meticulous drywall repairs, thorough cleaning, and strategic priming, you ensure your new color looks professional and lasts for years. We've seen how even small shortcuts in the prep phase can lead to costly failures like peeling or bubbling. A seasoned approach prioritizes protection and surface integrity above all else. This methodical work is what separates a standard DIY attempt from a high-quality transformation.
As a local, family-owned business with over 20 years of residential experience, we take quiet pride in our craftsmanship. We specialize in the tedious prep work and expert drywall repairs that define a durable result. If the scope of your project feels overwhelming, we are here to help you achieve a stress-free refresh. You can Get a Free Interior Painting Estimate in Rio Rancho to see how our expertise can bring your vision to life. Your home deserves a finish that stands the test of time, and starting with the right foundation is the first step toward that goal.
Frequently Asked Questions
Do I really need to wash my walls before painting if they look clean?
Yes, washing is a critical step even if walls appear clean. Invisible contaminants like skin oils, dust, and microscopic soot settle on every surface over time. If you don't remove these, the paint will sit on top of the debris rather than bonding to the wall. For kitchens and high-traffic areas, use a solution of Trisodium Phosphate (TSP) to cut through grease. This ensures the substrate is chemically ready for a lasting finish.
How do I fix small cracks in my drywall before the painters arrive?
Small hairline cracks are best repaired using a high-quality joint compound. Apply a thin layer over the crack, let it dry, and then sand it smooth with 220-grit sandpaper. For slightly larger stress cracks, we recommend using self-adhesive mesh tape to bridge the gap before applying the compound. This extra support prevents the crack from reappearing as the house naturally settles. Always feather the edges of your patch for an invisible repair.
What is the best way to protect my carpet from paint spills?
The most effective way to protect carpet is by using a combination of materials. Start with a layer of plastic to catch any major spills, then place a heavy canvas drop cloth on top. Canvas is superior because it stays in place and absorbs drips, preventing them from being tracked through the house. Secure the edges of the cloth to your baseboards using professional painter's tape to ensure total coverage.
Should I remove the old paint before applying a new coat?
You don't need to remove old paint unless it is peeling, bubbling, or flaking. If the existing finish is stable, simply sand any rough spots and clean the surface. However, if the old paint is failing, you must scrape it away until you reach a solid layer. Understanding how to prepare a room for painting often involves identifying these failing areas early to avoid future delamination where new paint pulls the old layers off.
How long does it take for drywall patches to dry before I can paint?
Drying times vary based on the depth of the repair and local humidity levels. Small nail holes filled with lightweight spackle can often be sanded and painted within one to two hours. Deeper repairs using joint compound typically require 24 hours to cure completely. Rushing this process traps moisture behind the paint, which leads to bubbling. Always wait until the patch is completely white and firm before applying your primer.
Can I use masking tape instead of professional blue painter's tape?
Avoid using standard tan masking tape for your project. Masking tape has a high-tack adhesive that often leaves a sticky residue or pulls up existing paint when removed. Professional blue or green painter's tape is designed with lower adhesion levels that allow it to stay in place for several days and release cleanly. This ensures you get those sharp, professional lines without damaging your trim or newly finished surfaces.
What happens if I skip the priming step?
Skipping the primer often results in "flashing," where the final finish looks blotchy or uneven in different lighting. Primer seals the porous surface of the drywall and provides the necessary "tooth" for the topcoat to grip. Without it, you may experience poor color coverage and reduced durability. Learning how to prepare a room for painting correctly means treating primer as a non-negotiable foundation for any color change or repair area.
How do I prep a room that has high-gloss paint on the walls?
High-gloss surfaces are too slick for standard paint to adhere to directly. You must first de-gloss the area by sanding it lightly with 180-grit to 220-grit sandpaper until the shine is gone. This creates a mechanical bond. After sanding, wipe away the dust and apply a high-quality bonding primer. This specialized product is designed to stick to smooth surfaces, ensuring your new coat doesn't peel or scratch off easily.


