
Invisible drywall repair is 10% filling the hole and 90% managing the surface texture and porosity. Most homeowners think a quick dab of spackle is enough, but that is exactly why patches often look like ugly bumps once the light hits them. Mastering drywall hole repair before painting is the only way to ensure your walls look like they were finished by a seasoned craftsman rather than a weekend amateur. It is the difference between a project that looks rushed and one that looks like a high-end renovation.
We know how frustrating it is to finish three coats of paint only to see every single repair area still visible underneath. You want a smooth, flat surface that makes your home feel clean and updated, not a wall that highlights every past mistake. This guide shares the professional secrets to achieving a flawless finish that stays invisible. We will walk you through the exact materials you need, the right way to sand for a seamless transition, and the critical prep work that ensures your paint sticks perfectly. You'll gain the confidence to handle any hole and the knowledge to get the job done right the first time.
Key Takeaways
- Learn to identify which surface defects are DIY-friendly and when a professional is needed to restore your wall's integrity.
- Master the essential tool kit, including why you need both two-inch and six-inch blades for a seamless drywall hole repair before painting.
- Follow a craftsman's step-by-step process for cleaning, overfilling, and sanding patches to create a perfectly flat surface.
- Eliminate "flashing" by using the correct priming techniques to seal porous compounds before the first coat of paint.
- Discover how professional prep work and dust-controlled methods result in a cleaner home and a higher quality finish.
Assessing the Damage: When to Patch vs. When to Call a Pro
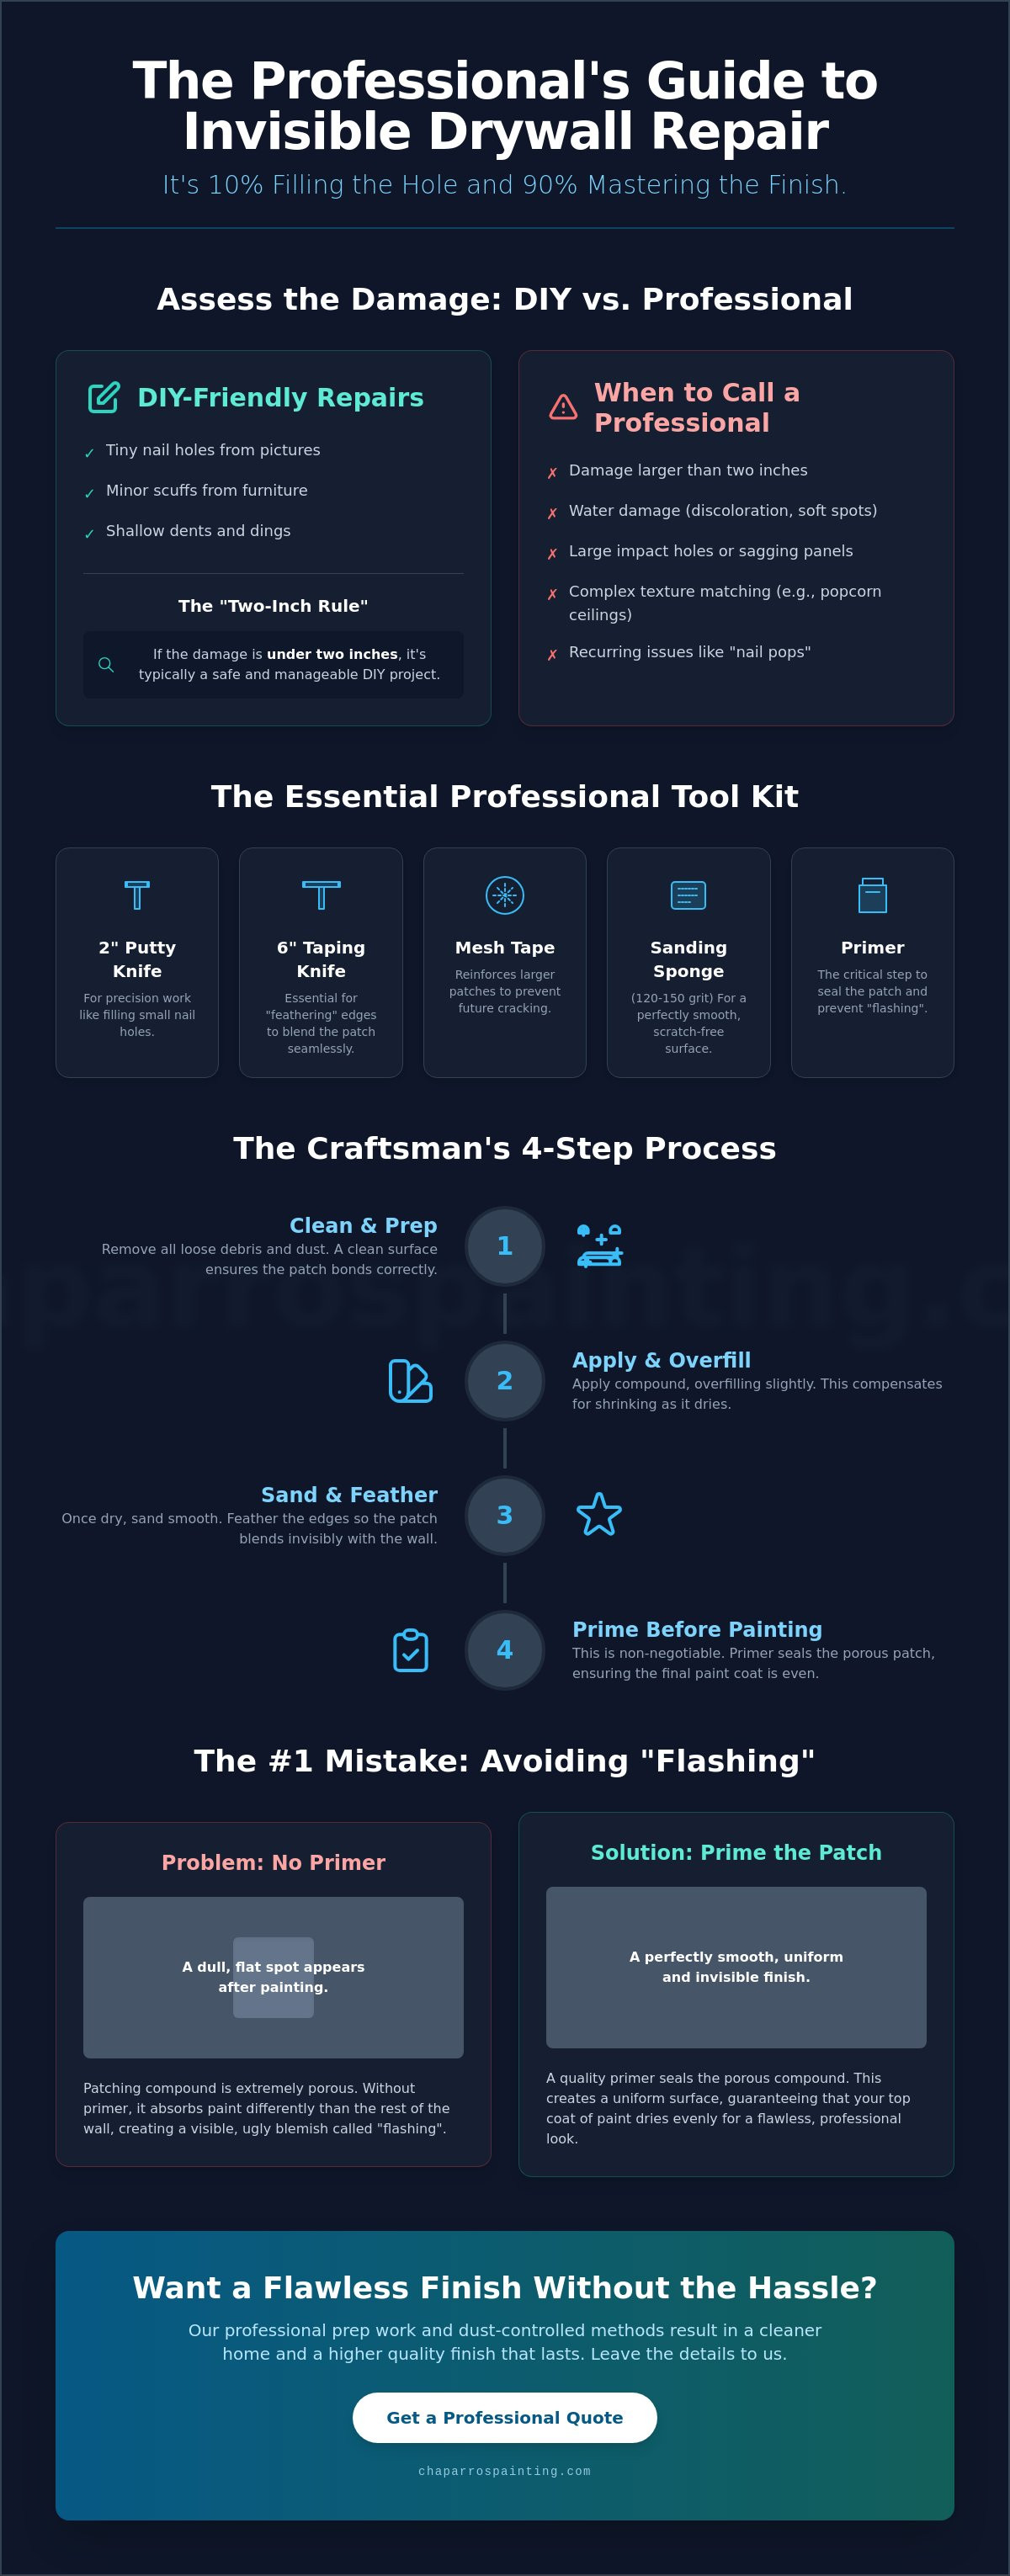
Drywall prep is the foundational step in any professional paint job. It involves restoring the surface integrity of your walls so they can hold primer and paint evenly. Before you start your drywall hole repair before painting, you need to know exactly what you are looking at. Understanding what is drywall helps you realize that these panels are essentially gypsum plaster sandwiched between paper. When that paper or core is compromised, the fix depends on the size and cause of the damage.
Small defects include things like tiny nail holes from pictures, minor scuffs from furniture, or shallow dents. These are perfect for DIYers. Medium defects include wall anchors, doorknob dings, or small cracks. These usually require mesh tape to prevent the patch from cracking later. Structural issues are a different story. If you see water damage, large impact holes, or sagging panels, you have moved into professional territory. Doing the job right means knowing your limits before you open a bucket of compound.
The "Two-Inch Rule" for DIY Repairs
Most homeowners can successfully manage a drywall hole repair before painting if the damage is under two inches. This is our "Two-Inch Rule." Holes this size are small enough to be bridged by spackle or a small amount of joint compound without losing structural stability. Once you go beyond two inches, you often need to cut out sections of the wall and install new backing. Attempting large-scale drywall replacement without professional experience often leads to wavy walls and visible seams. If the structure isn't sound, your final paint finish will never look flat.
Signs of Hidden Drywall Trouble
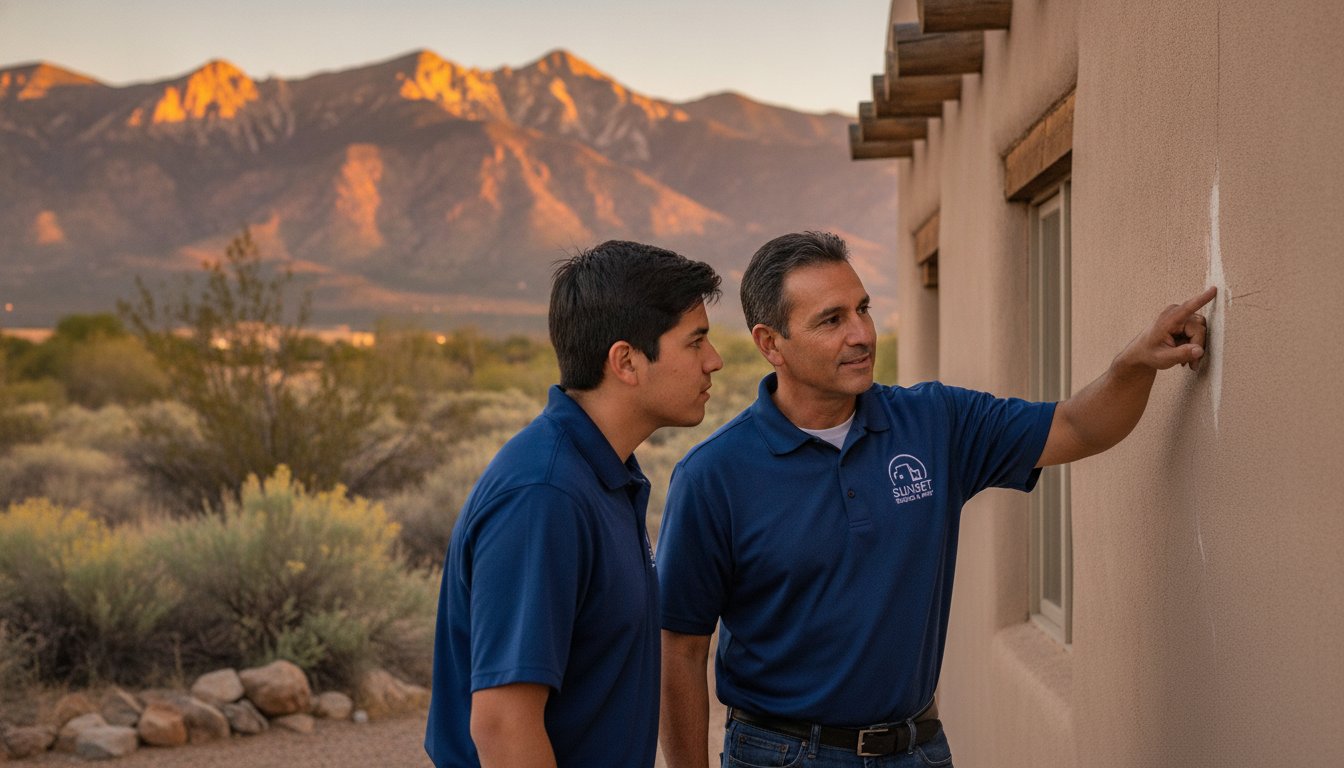
Sometimes the damage isn't just a simple hole. In the Rio Rancho area, we often see "nail pops." These are small, circular bumps or holes caused by the house settling or the wood framing drying out. While they look small, they require specific techniques to reset the fastener so they don't return. Moisture damage is another red flag. If a spot feels soft or looks discolored, patching it is a temporary fix that hides a bigger problem. Finally, textured ceilings are notoriously difficult to patch. Achieving a seamless blend on a popcorn or knockdown ceiling requires a specific touch. In these cases, professional drywall repair Rio Rancho is a safer choice to ensure the repair doesn't stand out like a sore thumb.
The Essential Professional Tool Kit for Drywall Prep
A craftsman is only as good as their tools. If you want a seamless finish, you cannot rely on a kitchen knife and a tub of old spackle. Professional drywall hole repair before painting requires a specific set of equipment designed to manage surface tension and texture. These tools allow you to apply, smooth, and blend materials so the repair becomes invisible under a fresh coat of paint.
Start with your knives. You need a two-inch putty knife for precision work, like filling small nail holes or scraping away loose debris. You also need a six-inch taping knife. The wider blade is essential for "feathering" the compound. This technique spreads the material thin at the edges, making the patch blend into the surrounding wall. Without that wider blade, you'll likely end up with a noticeable hump where the patch sits higher than the rest of the surface.
For holes larger than a dime, don't skip self-adhesive mesh tape. Without this reinforcement, the patch will eventually crack as your home naturally shifts with the seasons. Finally, keep a high-quality interior primer on hand. Patching compounds are extremely porous. If you don't seal them before you start painting, they will soak up the moisture from your topcoat, leaving a dull, flat spot that ruins the uniform look of your walls.
Choosing the Right Patching Compound
Not all compounds are the same. Lightweight spackle is perfect for tiny nicks and scuffs. Many DIYers prefer "pink-to-white" formulas because they provide a visual cue when they are dry enough to sand. For deeper repairs, setting-type joint compounds are superior. They harden through a chemical reaction rather than just evaporation, which minimizes shrinking. In the dry New Mexico heat, compound dries fast. Always keep your buckets tightly sealed. A simple trick is to press a piece of plastic wrap directly onto the surface of the mud before closing the lid to prevent a crust from forming.
Sanding Tools for a Dust-Free Finish
Sanding is where the final look is decided. Use a fine-grit sanding sponge (120-150 grit) instead of loose sandpaper. Sponges conform to the wall's shape and are much easier to use in corners or on curved surfaces. Always use a bright work light held at an angle against the wall. This "raking light" reveals tiny shadows that show exactly where your patch is still uneven. To keep your home clean, use plastic sheeting and a vacuum with a fine-dust filter. If gathering all this gear feels like a lot of work for a few small spots, our team at Chaparro’s Painting already has the professional setup and experience to handle the prep for you.
Step-by-Step: Repairing Drywall Holes Like a Craftsman
Invisible repairs require a methodical approach. You cannot simply slap some compound over a hole and expect it to disappear under a coat of paint. A professional drywall hole repair before painting follows a specific sequence that ensures the patch is structurally sound and perfectly level. Each step builds on the last. If you rush the prep, the final paint job will suffer.
The dry Albuquerque climate works in your favor during this process. In more humid regions, joint compound can take an entire day to cure. Here in New Mexico, the low humidity accelerates evaporation. This allows you to move through multiple coats much faster. However, this also means you must work quickly with your tools before the material starts to set on your knife.
Prepping the Hole for Adhesion
Cleanliness is the key to a lasting repair. Use a utility knife to remove any loose debris or frayed paper edges around the hole. For cracks, use the knife to create a small "V" notch. This wider opening gives the compound more surface area to grip. If you are dealing with old wall anchors, don't just pull them out. This often tears the gypsum and creates a larger mess. Instead, use a Phillips head screwdriver to push the anchor slightly past the surface or carefully cut the flange off with your utility knife. Always wipe away the white dust with a tack cloth before you apply any material. Dust is the primary reason patches fail to stick.
The Art of Feathering the Edges
Apply your first coat of compound using a two-inch putty knife. Overfill the hole slightly to account for the minor shrinkage that happens as the moisture evaporates. Once the first layer is dry, it's time for the feathering coat. Hold your six-inch taping knife at a 45-degree angle. Apply pressure to the outer edge of the blade while pulling it across the patch. This spreads the compound two to three inches beyond the original hole. Feathering prevents the "bump" look common in DIY repairs. It creates a gradual transition that the human eye cannot detect once it's painted.
Sanding and Final Inspection
Once the final coat is completely dry, use a fine-grit sanding sponge. Work in a light, circular motion to avoid gouging the soft compound. Avoid the temptation to sand everything off; you just want to remove the ridges. Perform a "touch test" by running your bare hand over the area. Your fingers are much better at finding subtle bumps or dips than your eyes are. If it feels like a single, continuous surface, you've succeeded. Finish by wiping the wall down one last time. Removing every trace of sanding dust is essential for your drywall hole repair before painting to bond correctly with the primer.
Avoiding the "Flash": How to Prime and Texture Match
Even a perfectly flat patch can ruin a room if it reflects light differently than the rest of the wall. This visual glitch is called "flashing." It occurs when the repair area has a different texture or porosity than the original drywall. Completing a drywall hole repair before painting is only half the battle. You must also treat the surface so it behaves like the surrounding material once the rollers come out. If you skip these steps, your patch will look like a shiny or dull island in a sea of uniform paint.
Blending the new paint is the final hurdle. Even if you have the original can, the paint on your walls has likely faded slightly over time. Don't just paint the patch. Instead, use a "dry brush" or a lightly loaded roller to feather the new paint out into the existing finish. This creates a soft gradient rather than a hard line. This technique, combined with a proper drywall hole repair before painting, is what separates a DIY project from a professional renovation. It ensures that when guests walk into the room, they see the color of the walls, not the history of the repairs.
Why Priming is Non-Negotiable
Patching compounds are incredibly porous. They "drink" the moisture out of your paint faster than the sealed drywall around them. This causes the pigments and binders in the paint to sit unevenly, creating a noticeable change in sheen. Priming is the only way to seal that porosity and create a uniform surface. For most interior repairs, a high-quality latex primer works well. However, if you are covering stains or using a setting-type compound, an oil-based primer provides a superior barrier. Spot priming the patch is usually enough for minor fixes, but for a truly high-end finish, we often prime the entire wall to ensure total uniformity.
Matching New Mexico Wall Textures
Most homes in the Rio Rancho and Albuquerque area feature specific wall textures like orange peel or knockdown. A smooth patch on a textured wall is a dead giveaway of a repair. For orange peel, you can use aerosol texture sprays. The trick is to practice your spray pattern on a piece of cardboard first to match the "weight" of the existing texture. For knockdown finishes, you apply a heavier splatter and wait for it to lose its shine before lightly "knocking it down" with a wide putty knife. It’s a game of timing. If you scrape too early, it smears; too late, and it won't flatten. If your home has complex, stucco-style interior textures, you may want to book a professional drywall repair to ensure a perfect match.
Professional Prep for a Perfect Finish in Rio Rancho
A high-end paint job is only as good as the wall behind it. At Chaparro’s Painting, we treat drywall hole repair before painting as a critical phase of the project, not an afterthought. We've spent over 20 years refining our process to ensure every patch is invisible and every surface is ready for a flawless finish. Our reputation in Rio Rancho is built on this quiet pride in craftsmanship. We don't cut corners because we know that shortcuts eventually show through the paint. A properly repaired wall provides the smooth, flat surface required for modern paint sheens to look their best.
One of the biggest concerns homeowners have is the mess. Drywall dust is fine and invasive; it can travel through an entire house if not managed correctly. We utilize a dust-controlled repair process to protect your home and your furniture. By using specialized sanding equipment and strategic containment, we keep the workspace clean from start to finish. This discipline allows us to work efficiently without compromising the air quality in your living space. It's a standard part of our professional service that ensures your home remains a comfortable environment during the project.
The Chaparro’s Painting Difference
We believe in transparency and punctuality. When we arrive at your home for an interior project, we follow a methodical schedule that respects your time. Our team handles everything from minor nail holes to complex drywall hole repair before painting and even interior stucco repairs. We understand the specific needs of New Mexico homes, including how the dry climate and local soil conditions lead to settling cracks or nail pops. We don't just cover these issues; we fix the surface integrity so your new paint job lasts for years without the damage returning.
Ready for a Flawless Interior Refresh?
Hiring a seasoned craftsman saves you time and eliminates the frustration of visible patches. You won't have to worry about mismatched textures or repairs that "flash" in the afternoon sun. We provide the peace of mind that comes from knowing the prep work was done to professional standards. This thoroughness ensures a high-end look that adds real value to your property. If you are ready to transform your living space with a professional touch, contact Chaparro’s Painting for a professional interior estimate today!
Achieve a Flawless Finish in Your Home
A perfect paint job starts long before the first roller hits the wall. By following a disciplined approach to cleaning, filling, and feathering, you can eliminate the bumps and shadows that often ruin interior surfaces. Remember that priming is the only way to stop "flashing" and that matching your specific New Mexico wall texture is essential for an invisible repair. Mastering drywall hole repair before painting is a skill that pays off in a high-end look for your home.
If you prefer to leave the meticulous prep work to the experts, our team is ready to assist. Chaparro’s Painting brings over 20 years of local residential experience to every project. We specialize in the detailed drywall repairs and surface prep that homeowners in Rio Rancho, Albuquerque, and Santa Fe have trusted for decades. Get a Professional Interior Painting Estimate in Rio Rancho and take the first step toward a seamless home transformation. It's time to give your walls a finish that looks right and lasts for years to come.
Frequently Asked Questions
Do I really need to repair small nail holes before painting?
Yes, you must repair every small nail hole before you begin. Paint is designed to provide color and sheen, but it is not a structural filler. If you skip this step, the paint will simply flow into the hole and leave a visible dimple on your finished wall. A quick application of spackle ensures the surface is perfectly flat and professional.
How long should I wait for spackle to dry before I start painting?
Drying times depend on the depth of the hole, but you should typically wait 30 minutes to two hours for lightweight spackle. In our dry New Mexico climate, moisture evaporates quickly, which often speeds up the process. Deeper repairs using all-purpose joint compound may require a full 24 hours to cure before they are ready for sanding and primer.
Why can I still see the patch after I painted over it?
Visible patches are usually caused by "flashing" or a texture mismatch. Patching compound is much more porous than the rest of your wall and absorbs paint differently, which creates a dull spot. A successful drywall hole repair before painting requires a coat of primer to seal that porosity and a careful texture match to blend the patch into the surrounding area.
Can I use toothpaste to fill small holes in my drywall?
No, toothpaste is not a suitable substitute for professional repair materials. It lacks the necessary binders to stay in place and will eventually shrink, crack, or even attract pests. Toothpaste also reacts poorly with modern paint formulas. It is always better to use a small tub of lightweight spackle for a permanent, clean result that won't fail over time.
Do I need to sand the wall after every coat of spackle?
Light sanding between coats is a standard practice for a flat finish. It removes small ridges and ensures the next layer of compound bonds correctly to the surface. You don't need to sand aggressively; a quick pass with a fine-grit sponge is enough. This step prevents the compound from building up and creating a noticeable bump on your wall.
What is the best way to match the texture of my wall after a repair?
Aerosol texture sprays are the most effective tool for matching common New Mexico finishes like orange peel. Always practice your spray pattern on a scrap piece of cardboard first to match the weight of the existing texture. For knockdown finishes, wait for the splatter to lose its shine before you lightly flatten the peaks with a clean, wide putty knife.
Is it better to use spackle or joint compound for hole repairs?
Spackle is ideal for small nicks and nail holes because it dries fast and shrinks very little. Joint compound is the better choice for a more extensive drywall hole repair before painting, especially when you need to use mesh tape. Joint compound is more durable for structural repairs and allows for smoother feathering over larger surface areas.
How do I fix a large hole where a wall anchor used to be?
First, use a utility knife to cut off the plastic flange or use a screwdriver to push the anchor into the wall cavity. Don't pull the anchor out, as this often tears the drywall paper and creates a larger mess. Once the anchor is clear, apply a small piece of mesh tape and cover it with two thin coats of joint compound.